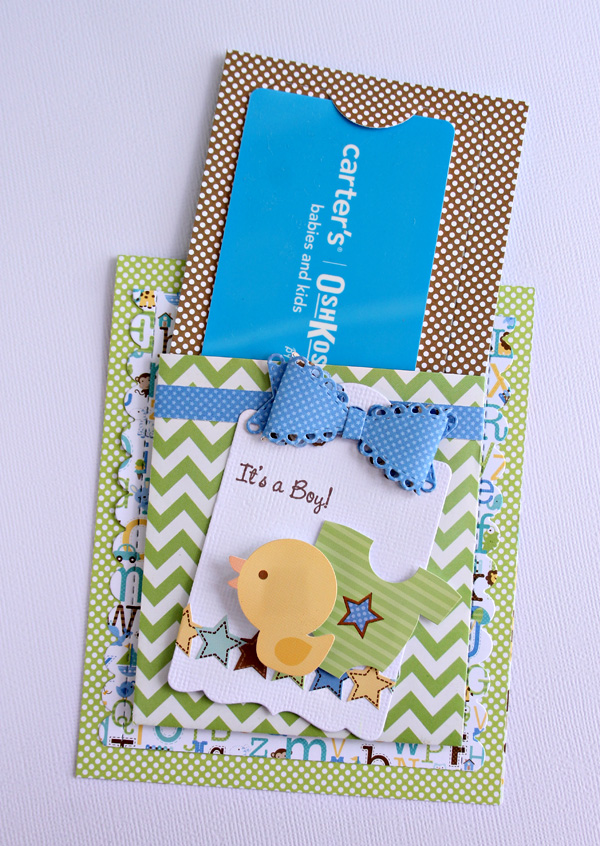
Treat Bag Gift Card Holdersby Candace

Hey everyone! Candace from Scrappin' 2 Little Princesses here with a couple cute little cards I made with the awesome Doodlebug treat bags. They are the perfect size to hold a gift card and I know a lot of families having babies right now so I dove head first into the Sugar & Spice and Snips & Snails Collections.
I love how quick and easy it is to pull cards together with some Doodlebug paper, embellishments and a couple of metal dies! These cards took no time at all.
I trimmed down the treat bags by cutting a bit off the top then dressed it up using a tag, paper bow (made using a die from My Creative Time) and some Doodlebug cardstock stickers.
I cut a piece of cardstock that would fit perfectly into the treat bag and used a gift card holder die (Jaded Blossom) to add the perfect spot to place a gift card.
To add dimension to my cards, I used foam stickers to adhere the stickers and treat bag.
The treat bags come in a variety of super fun colors and patterns that coordinate with tons of the Doodlebug collections.
These treat bags are so fun and I can think of so many ways they can be used! My next project with them will be an advent calendar so stay tuned! Thanks for stopping by today. I hope you have been inspired!
Treat Bag Cards
by Amanda Coleman
Amanda here today and I {heart} Doodlebug treat bags! They come in a wide variety of colors and can be used in so many ways. I cut, trimmed, and punched my treat bags to create background patterns on cards. The bright colors and graphic patterns are sure to liven up any project!
I have just rediscovered my circle punches and I have been having so much fun. One of the easiest ways to create a card background is to punch a bunch of circles in a variety of colors and sizes. Place them around the border of the card, stamp a sentiment in the center, and you have a finished card!
To add some texture and dimension to my card I added some Sprinkles dots. The colors from the spring assortment coordinate perfectly with the treat bag colors.
Bright pink Doodlebug stripes are my favorite pattern of all time! They are bright and bold and are versatile enough to be used on many projects. I used the pink striped treat bags to create the background on this card. I alternated the pattern and embellished the card with a bold sentiment and flowers.
I created the background by adhering the treat bag squares directly to my card base. I laid out my pattern on my workspace before I adhered the squares to the card. To make the process a bit easier, I applied adhesive directly to the card base rather than to each individual square.
I used the same treat bags to create this graphic angles card. I cut the treat bags open and adhered them to the card as I would any patterned paper. I stamped the sentiment with coordinating ink.
Happy Doodlebugging!
Amanda
Supplies: Doodlebug treat bags, Springtime collection stickers and sprinkles, circle punches (EK Success); sentiment stamps (Technique Tuesday, Reverse Confetti); ink (Avery Elle)


Such fun cards ladies!!!
ReplyDeleteAdorable cards! There are so many uses for these treat bags!
ReplyDeleteDarling idea ladies! Love them! :)
ReplyDeleteWow - these treat bags from Doodlebug are just super amazing!! Love the cards made by Candace and how she used 2 different collections with the bags but yet it all still coordinated because of Doodlebug's awesomeness!! And Amanda, I love how she thinks outside the box - what a cool, fantastic idea to use the bags as pattern paper and make super unique cards!! Just WOW my hat is off to the two of you!!
ReplyDeleteSUPER CUTE gift card holders Candace - LOVE the bows and pretty layers!!!
ReplyDeleteFUN & FABULOUS cards Amanda - LOVE the circles (I confess that I have a long term circle punch addiction), LOVE the geometric designs too!!!
THANK YOU for sharing your sweet treat bag inspiration ladies :)
How cute! Greta projects!
ReplyDelete