Showing posts with label 3D Crafts. Show all posts

Saturday, September 16, 2023

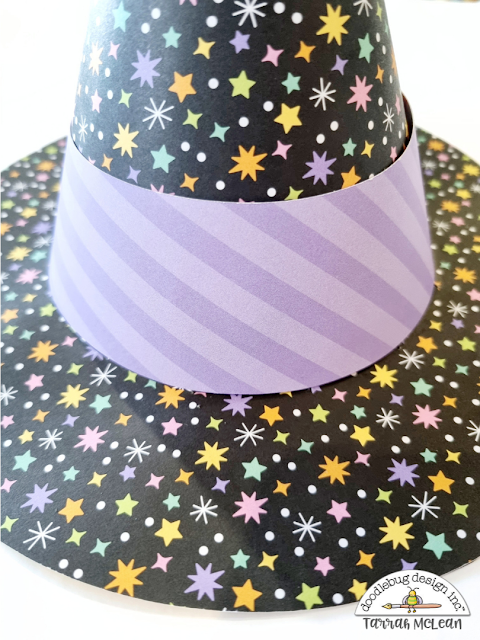
SWEET & SPOOKY WITCH'S HATS TUTORIAL | with Tarrah

With Halloween right around the corner, what better way to get ready for the spooky season than with some super cute witch's hats using the gorgeous, new Sweet and Spooky collection!


I have a tutorial for you today to follow along and create your very own witch's hats! You will need an electronic cutting machine to cut out the SVG file pieces (link below) or if you are feeling game you could try free-hand cutting them! 

I resized the pieces from the SVG file so that my hats would be larger. Step 1 is to cut out all 4 pieces, 2 will need to be from the same paper, the hollow circle is plain cardstock and the skinny half circle/band, choose a contrasting color. See the first image below.


Step 2. Grab the hollow circle and the circle with slits in the center. Glue the hollow circle on top of the circle with slits - but make sure you glue it on the side you DON'T want shown on the hat. See image above where I have turned the circle with slits over to glue the black piece on.


Step 3. Next, flip over your newly glued circle and add glue to each slit. You will want to make sure you glue this well. Once that is done, push the slits up towards you. See left image above. These will secure the base of the hat to the top of the hat. Take the half circle and glue it into a cone. See right image above. Then place on top of the slits. You may want to shape the cone a little bit over the slits to make sure it is the right size before gluing.


Step 4. Press the slits against the cone to glue securely together and to create the hat shape. Lastly, add your cute band and embellish. And that's it! These hats are super easy to make!


I made 3 of these super cute witch's hats, 1 for myself and 2 for my nieces to wear for Halloween! You could add a hair comb or some pins to attach to your hair or you could use these as decorations by adding string to hang them or just sit them on your front porch!


For each hat, I chose a theme when thinking about how I wanted them to look, I did 1 in a pumpkin theme, 1 in a candy theme and 1 in a spider theme. I chose all the embellishments from the Sweet and Spooky collection, including Odds and Ends, Chit Chat, Puffy Stickers, Shape Sprinkles and Doodle Pops. Everything co-ordinates perfectly and this makes it so easy to create fun projects! I added some Doodle Twine around the bases of the hats and used the same color twine at the top to hang a Little Charmer from too. I also used some mini jewels to add some sparkle to each hat as well.


I just love how these witch's hats turned out! I hope I have inspired you to create something cute and fun with the Sweet & Spooky collection! Don't forget, you don't always have to make projects on a page - you can create pretty projects off the page too! Happy creating!


DOODLEBUG PRODUCTS USED

Sweet & Spooky collection
Mini Jewels - Cupcake, Tangerine & Lilac
Doodle Twine - Cupcake, Tangerine & Lilac

OTHER

Black Cardstock
Silhouette Cameo
Witch's Hat SVG file (click to download)


Wednesday, May 18, 2022

DOWN ON THE FARM BIRTHDAY BOX | with Miguel

Altering boxes is something I love to do. I created this new idea to "package" together a group of altered boxes.   It is made with the beautiful Down on the Farm collection and the Down on the Farm Petite Prints Assortment.  I plan to give this to someone special for his birthday!

Petite Prints are my favorite papers and go-to product when it comes to creating,  It's great how you can use them with a number of Doodlebug Collections. Their wide variety of designs and colors give you a great palate to create with!

I used the 3x4 cards on the b-side of the Buffalo Check paper as the main focus of my project.  They decorate the outside as well as each of the boxes.

You can fill these boxes with so many things!  Letters, photos, little gifts.  The recipient will treasure the contents!


I hope and you like my work today. And as always I hope it inspires you to continue creating. goodbye!


FACEBOOK | INSTAGRAM

DOODLEBUG PRODUCTS USED

Down on the Farm Collection


Tuesday, April 12, 2022

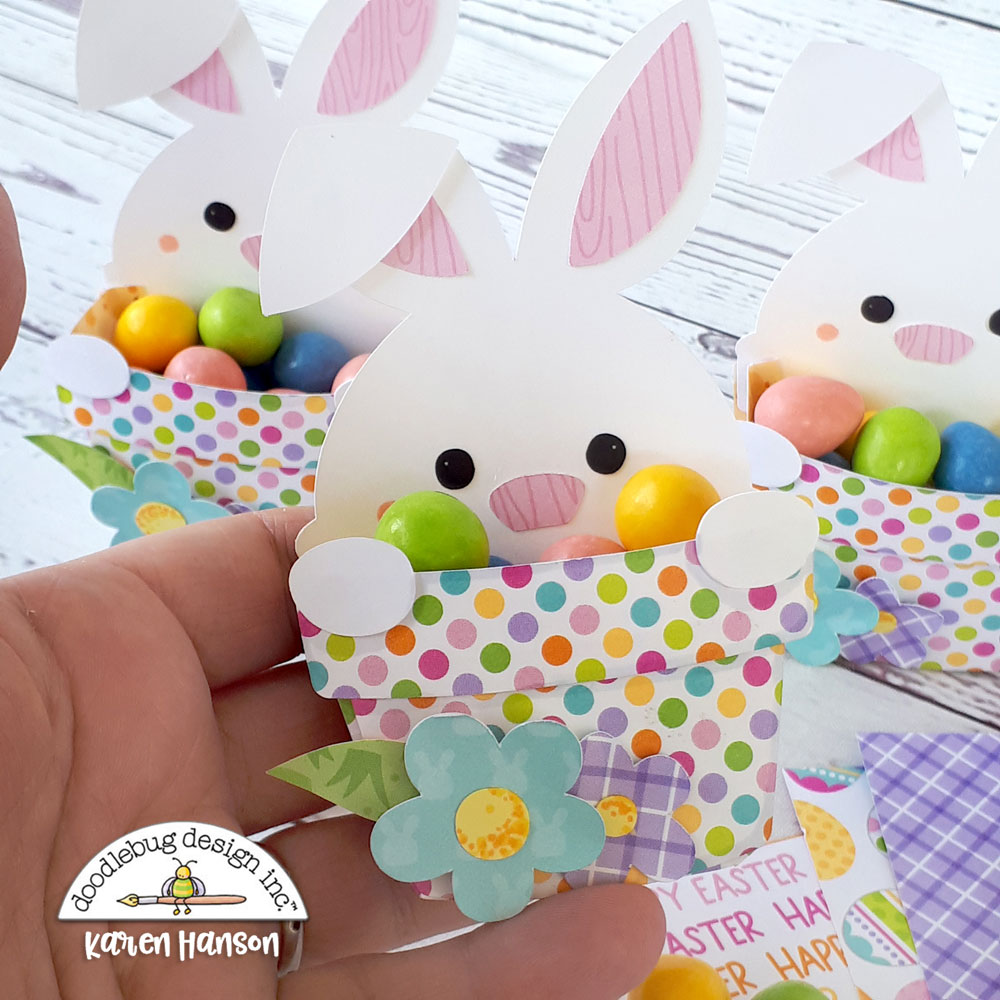
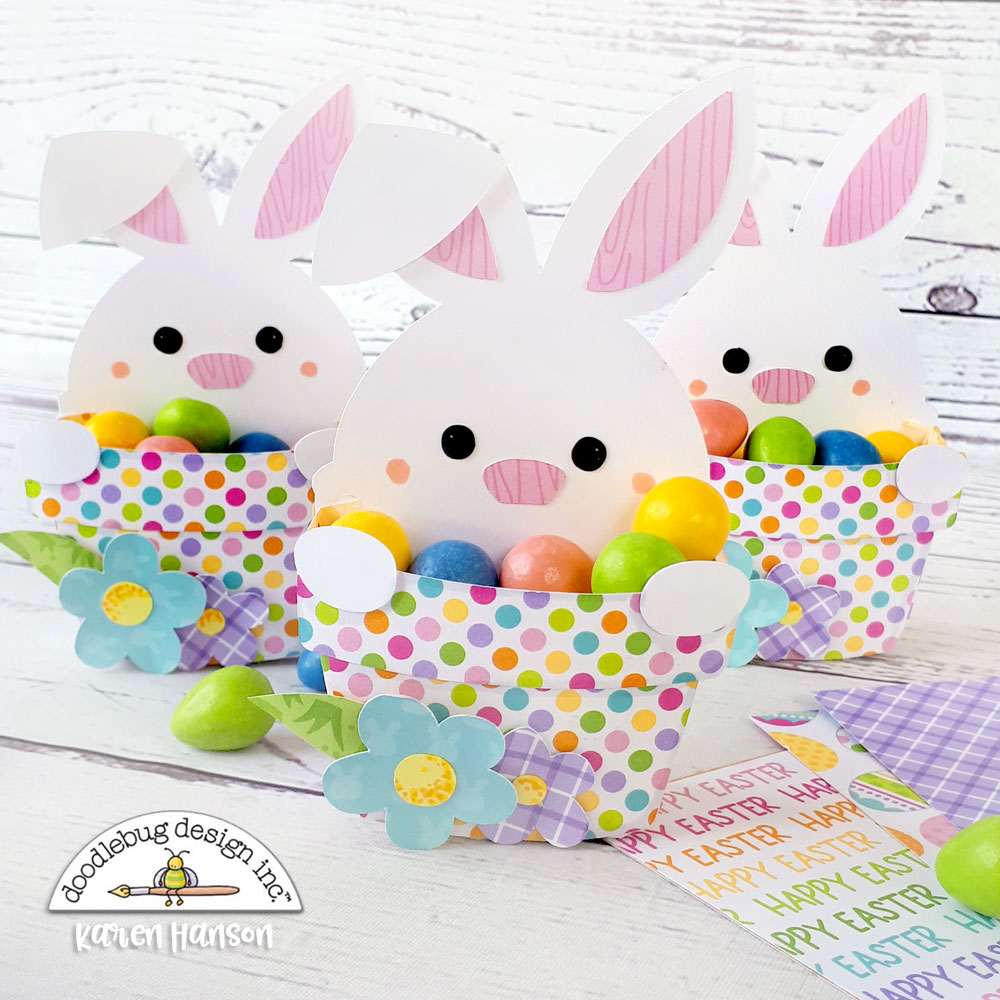
HIPPITY HOPPITY BUNNY TREAT CUPS | with Karen

Easter is this week and it is a small miracle that there are still Easter chocolate treats in my house. Usually by now I have restocked at least once! I blame Doodlebug completely - their Easter collections are always so darn cute that I find myself using them this time of year to make all kinds of cute treat containers. And if you are making treat containers, one must take out the treats to make sure they work in the creations. And then one must sample the goods to make sure they are worthy of the cute treat containers. I know you know what I am talking about!

Hand-photo

db-hoppy-easter-bunny-3__22064.1551761357

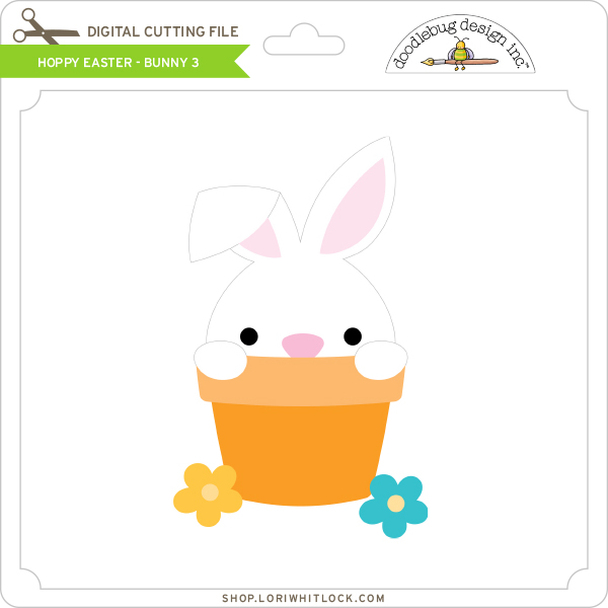
So for this week's project, I actually grabbed the Hippity Hoppity 12x12 papers and teamed them up with a darling Doodlebug cut file you can find at the Lori Whitlock store (Hoppy Easter - Bunny 3- link below).

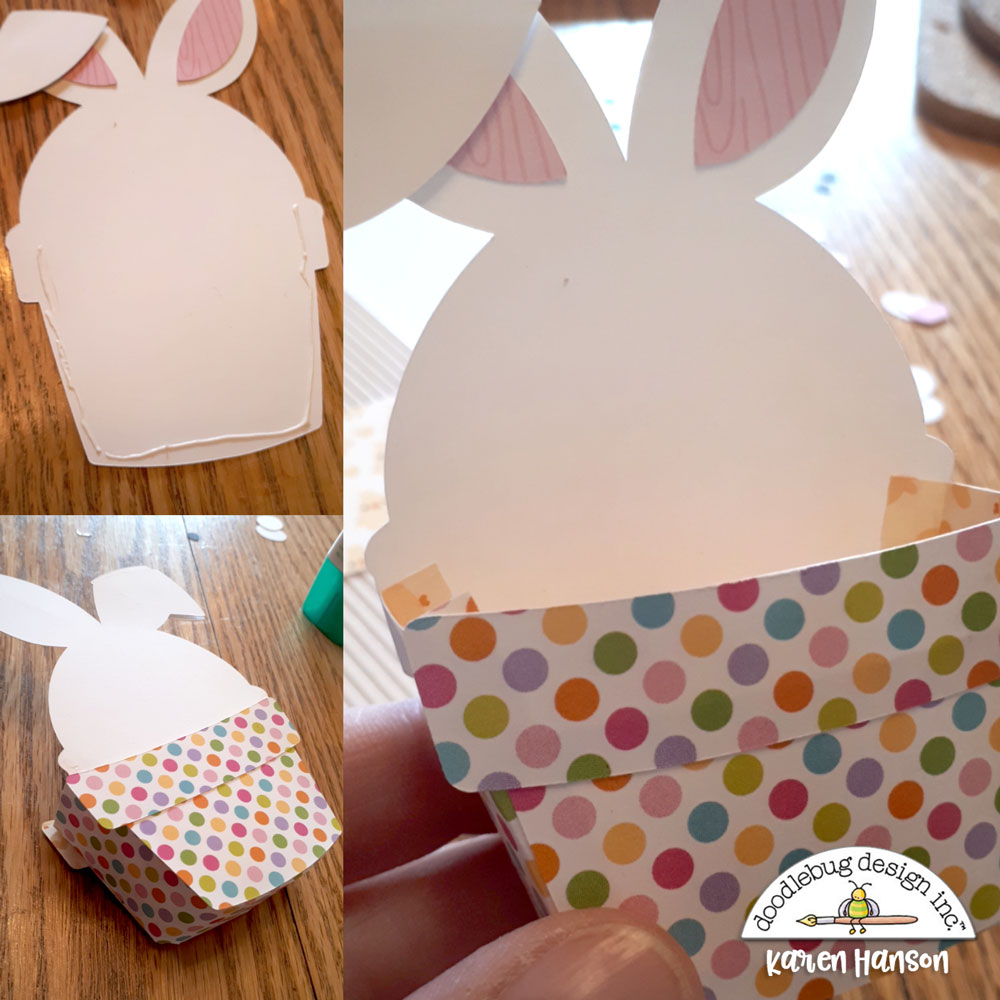
While this is a flat file, I figured I could turn it into a cute 3d treat box with just a little effort. Here are some tips if you would like to try it too:

Tutorial-1

When you cut the file, cut an extra copy of the pot shapes. One will create the front of the treat box and the other will go on the back to make the treat container look a little more finished from the back. I also only glue around the edge of the back pot so I can add a little note into it as well.

Cut a strip of paper 1.5" wide and the length of your 12x12 paper. Score 1/4" from each long edge. This will create the side panel for your pot - the piece you need to create to turn this from a flat cut file to a 3D shape. Cut up along the long edge of the paper to the score line. Then use these tabs to secure the side panel to the front pot first...

Tutorial-2

...and then onto the large white cutout of the rabbit to close the shape. Trim off the excess. I printed the cut file at about 5.5" wide and needed about the same in length for the side panels. Add the second cutout of the pot to the back and then add the details.

All-3-1

I also modified the size of the flowers in the cut fil by making one larger just for a bit of a different look. Fill up your treat containers and you are all set to go.

Side-view

Here's a side view so you can see the 1.5" side panel in action.

Closeup

I really love how these turned out! I think I need to go check out the other Doodlebug cut files to see if I can modify them in this way as well - if the treats last that long, that is!  Thanks for stopping by!


BLOG | INSTAGRAM

Doodlebug Design Product:
Hippity Hoppity Collection
Petite Prints

Other Products:
Hoppy Easter - Bunny 3 SVG
Adhesive
White cardstock

Monday, April 4, 2022

HIPPITY HOPPITY EASTER BASKET | with Kathy

Hippity Hoppity, Easter's on it's way!  I have always loved Easter crafting.  The fun pastel colors, the bunnies, lambs and chicks... and let's face it... the chocolate!  I created this fun little Easter basket, along with a paper version of an egg-hunt egg using the Hippity Hoppity Collection.  Take a peek...


I started with this SVG file for my basket.  I cut it from the purple side of the Hippity Hoppity paper.  I love how the plaid pattern looks with the woven basket!  Inside the basket I added a fun little 3D Easter Egg, filled of course with something sweet!


The egg was made using some petite prints and my favorite paper from the collection, the Easter Basket plaid!!


I love how the egg also stands on it's own!


I decorated the outside of the basket with a bunny and flowers from the Hippity Hoppity Odds & Ends.

Hopefully I can resist eating all the chocolate eggs before Easter arrives!  That's it for me today, thanks for stopping by to peek!


DOODLEBUG PRODUCTS USED
Hippity Hoppity Collection
Chunky Brads Spring Assortment
Dot Stripe Petite Prints - Bubblegum


Friday, September 3, 2021

CUTE & CRAFTY 3D SEWING MACHINE | with Jennifer

Hello Doodlebug friends. It's so good to be back and sharing this fun piece I created using the Cute and Crafty collection. My project is centered around this little cutie.

Here she is all dressed up and looking "sew" cute in her Doodlebug patterned papers and embellies.

Here's how the machine looked when I got started. You can see I omitted some of the cutting file design and just kept the basic shape. It was cut from 9 layers of foam board, which is almost 2 inches thick. So to cut this out I used my table saw. After cutting out the machine I decided, to cut two more additional layers. One for the back and one for the front. This time I left a half inch off the bottom as indicated in the pics below. Using chipboard I covered the entire machine with chipboard

Here's my draft of the machine, with all the wood and chipboard pieces I used. The pieces were covered with patterned paper or paint.

The spools in the file were so adorable, so I tried to recreate them. I added a little paper and embroidery floss for the body and tiny sprinkles for his eyes.  The label adds a little color and of course a cute pun.

I always love to add a title to my pieces and here you can see I used buttons, die-cuts and and stickers to the front of the machine. A little stitching and a measuring tape, fit with the theme and were added as well.


Thanks for joining us today. Happy Crafting!! :)

 Blog | Etsy | Pinterest

DOODLEBUG SUPPLIES

Cute and Crafty Collection
Chunky Twine
Sewing Machine Cutting File
Boutique Buttons
12x12 Petite Prints - woodgrain/ buffalo, linen/gingham


OTHER
wood spools and other small wood pieces

chipboard
paint
foam board
tape measure

Tuesday, April 27, 2021

FAIRY GARDEN FAIRY HOUSE | with Miguel

This month has flown by!  I back again to with a new project and I am very excited to show it to you. If you remember that in my last post, I made a magic diary.  I decided I needed a very special place to keep it, so I made a Magic Fairy House!

The idea for my fairy house was  spinning inside my head a few days ago and it took me some time and dedication to realize it!

My Fairy House is an altered box.  For the upper part, I created  a beautiful garden with the Fairy Garden Collection. The project has different materials and effects such as lights, sound and movement. Isn't it lovely?


I started with a Mushroom cut file from the Silhouette Store.  I then let my imagination loose!  Inside the mushroom, I put a rotating mechanism with lights.
 

On the outside of the mushroom, I used all the embellishments from the Fairy Garden Collection to create this magical garden, also place a musical button to add more sweetness! Now my diary  has a special place to protect it!


I say goodbye as always thanking you for reading me and remembering that everything we imagine can be achieved!

Doodlebug Products Used
Fairy Garden Collection

Tuesday, February 16, 2021

MADE WITH LOVE SWEET COOKBOOK | with Miguel

Today I am happy to share my first project with the beautiful 'Made with Love Collection'.  It is an altered wood cupboard turned into a recipe book to store all those sweet recipes. How is that for a fun idea?

I started with the 12"x12" papers in the collection to cover the cabinet pieces and thus begin to give life to my composition in a super special way and to my style.


On the back I made a box with my scoring board to hold all the recipe cards. I kept decorating in a fun way with all the Made with Love icons, and placing a small title with the 'My Type' alphabet stickers.


At the top of my project I decorated with a wooden roller, which is very representative of the artisan work here in México.  All my composition is painted with acrylic paint in pastel.


Inside the drawer, I placed the beautiful pins from the 'Made with Love' collection.  They look beautiful inside, don't you think?  I also used some pop dots to give it dimension and it seems that they are totally real.


I say goodbye hoping that you like the project that I created as much as I do and that it will
inspire you.  Many thanks to Doodlebug Design for giving me the opportunity to show scrapbooking designs made in México.  Greetings and thank you for reading!


Doodlebug Design Products Used:
Made with Love Collection
Doodle Pops
Sprinkles
Boutique Buttons
My Type Alphabet stickers 
Pin It button on image hover