Showing posts with label 8.5 x 11 Layout. Show all posts

Saturday, November 21, 2020

PUMPKIN SPICE FALL DAYS LAYOUT | with Maryám

One of my favorite things from the Pumpkin Spice Collection is the cute little creatures. You can find from bears to foxes, to raccoons, to hedgehogs, and more! For today's layout, I am going to be using a cute bear with a very stylish scarf from the Beary Cute Doodle-Pops Cardstock Sticker.


To create my layout, I started out by selecting some pieces from the Odds & Ends Set. The idea was to create a scene with the bear on it so I selected some trees, a wood fence, and some grass. I played with different dispositions until I decided on one. Then, I adhered all the elements in place and left some space on the left to add my photo and journaling later.


To embellish the scene, I added some bubble text with fun sayings from the Chit Chat Set just like they were coming out from the images. In addition, I also added cardstock stickers and little sprinkles from the same collection here and there. 


For my title, I used "fall" from the Chit Chat Set and also the word "days" for which I used the Abigail Cardstock Stickers in Bon Bon color to keep a cohesive look on the page.


Now, let's take a look at the finished layout! 


That's it for today! I hope you enjoyed this layout and inspired you to create something new. If you have any questions feel free to leave a comment below, and I’ll be happy to help you. Have a great day!


Doodlebug Products Used: 
Pumpkin Spice Collection
Kraft Buffalo Check-Wood Grain Cardstock
Abigail Cardstock Stickers - Bon Bon

Thursday, November 19, 2020

PUMPKIN SPICE BEST DAY EVER LAYOUT | with Maryám

Oh, happy fall days! As you may already know, I love fall. It's not as hot as summer and it's not as cold as winter, which makes it the perfect season. For today's layout, I am going to be working with the adorable Pumpkin Spice Collection to document some photos of my sister I took a couple of years ago.


To create my layout, I started by printing the photos and journaling. I had sketched the layout idea in my mind before so that's why I decided to start with the photos this time. Once the photos were printed, I added some layers behind them and used foam adhesive to adhere them in place.


Following up, I put my title for which I used "happy" and "best day ever", both die-cuts from the Chit Chat set, plus a bubble text on the top right corner of the right photo.

To embellish the page, I added a few little flowers and some of the cute adorable little creatures from the Odds & Ends Set. To add some more texture, I added sprinkles to the center of each flower and around the page.


Last but not least, I added some big green brackets from the This & That 12x12 Sticker Sheet, and with that, I completed my layout!

Let's take a look at the finished layout!


That's it for today! I hope you enjoyed this post and inspired you to create something new. If you have any questions just leave a comment below, and I’ll be happy to help you. Have a wonderful day!


Doodlebug Products Used: 
Pumpkin Spice Collection

Saturday, September 26, 2020

HAPPY BIRTHDAY LAYOUT | with Maryám

Sunshine and Sprinkles! Does it sound like fun already?! Well, that's because for today's project we are going to be using the new Sunshine Alphabet Stickers and also the awesome Confetti Shape Sprinkles, both available and all of our favorite Doodlebug colors.


To create my layout, I started by cutting some strips from the 12 x 12 Party Plaid Girl Paper. Then, I selected my favorite ones, arranged them in a way they look nice to the eye, and adhere them to the page starting from bottom to top. 


Next, to embellish my page, I decided to incorporate some Confetti Shape Sprinkles and add them on to some of the elements of the stripes to add some extra detail and texture. For example, in the strip with cupcakes, I added little circle-shaped confetti sprinkles as toppings.

To add some more fun, I added some cute Odd & Ends Pieces around the page, as well as some cardstock stickers from the same Hey Cupcake collection.


Last, but not least, for my title, I used the gorgeous Sunshine Alphabet Stickers in- Swimming Pool, Limeade, Bumblebee, Tangerine, Bubblegum, and Cupcake to spell out the word "birthday" and also Happy Birthday - Doodle Cuts for the word "Happy".


Now, let's take a look at the finished layout!


That is it for today. I hope you guys enjoyed this post and liked the ideas I shared. If you have any questions just leave a comment below or send me an email. I'll be happy to help you.

Have a great day!


Doodlebug Products Used: 
Hey Cupcake Collection
Sunshine Cardstock Stickers - Bubblegum
Sunshine Cardstock Stickers - Cupcake
Sunshine Cardstock Stickers - Tangerine
Sunshine Cardstock Stickers - Bumblebee
Sunshine Cardstock Stickers - Limeade
Sunshine Cardstock Stickers - Swimming Pool
Shape Sprinkles - Cupcake Confetti
Shape Sprinkles - Bubblegum Confetti
Shape Sprinkles - Tangerine Confetti
Shape Sprinkles - Bumblebee Confetti
Shape Sprinkles - Limeade Confetti
Shape Sprinkles - Swimming Pool Confetti
Doodle Cuts - Happy Birthday
Dot-Stripe Rainbow Petite Prints 6 x 6 Paper Pack

Other Products Used:
Vellum Paper
Manual Die-Cutting Machine
Foam Adhesive

Friday, September 4, 2020

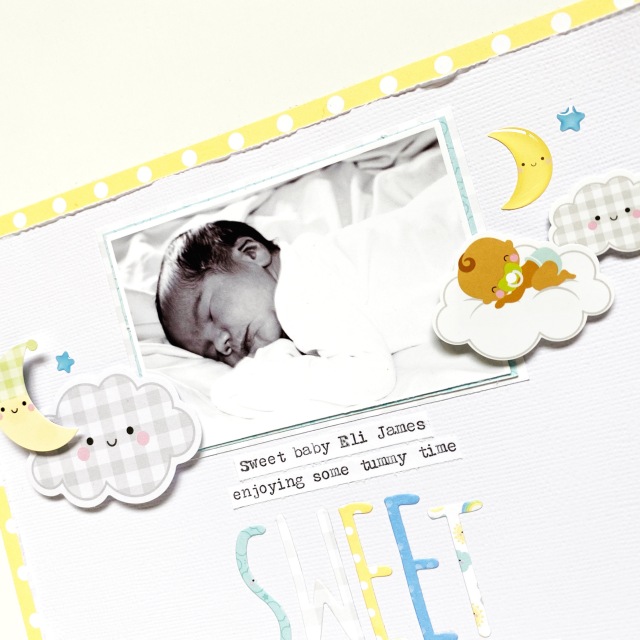
SWEET DREAMS LITTLE ONE LAYOUT | with Erica

Do you want an easy way to create a clean layout but also using a lot of different pattern papers? Why not use the new Alex Alphabet Doodle Cuts dies to create a big title for your page!

 
I decided to go with an 8.5x11 sized layout today and I am really enjoying creating layouts in this size. I cut down a piece of white cardstock and matted it on the pretty yellow pattern paper with white polka dots from the Special Delivery collection. I pulled out the Special Delivery 6 x 6 paper pad and started to build my title by die cutting out the letters using the Alex Alphabet Doodle Cuts.


My title is Sweet Dreams Little One and I thought this photo of our sweet Eli James sleeping on his tummy was perfect! I pulled out the Special Delivery embellishments and wanted to use a few of the clouds and cute moons in this collection. The super cute baby sleeping on the cloud had to go on this page as well because it is just perfect!

 
I sprinkled in some of the star sprinkles around the page as well and added some journaling under my photo. I just love how it turned out! I really like a lot of white space on my layouts but I think it goes well with this big title made up of lots of different patterns and colors. Here is a look at my completed layout.


 Doodlebug Products Used 

Special Delivery Collection 
 Alex Alphabet Doodlecuts    

Tuesday, September 1, 2020

SPECIAL DELIVERY HELLO BABY LAYOUT | with Maryám

Some months ago I created a layout for the Scrapbook & Cards Today blog featuring the sweet Bundle of Joy collection that you can see HERE. I really liked how it turned out and it is definitely on my personal list of my all-time favorite layouts. That's why for today's project, I decided to create a new layout inspired by the one I mentioned before but this time using the Special Delivery Collection to create a baby boy version! 

To create my layout, I started by selecting some pattern papers from the Special Delivery 6 x 6 Paper Pack. Next, I took one of the dies from the Doodle Cuts - Mini Tags Set and cut about five tags from each paper design using my manual die-cutting machine. Next, I put the tags together in stripes of five each using mini brads in coordinating doodlebug colors, and then. added them to my page using liquid adhesive.

Continuing with the process, I added my photo (thanks to my little cousin!), title, and journaling on the bottom portion of the layout. 


Last but not least, I added a bunch of embellishments around the page from the ChitChat and Odds & Ends Sets representing the story I wanted to tell. In addition, I also added some sprinkles and cardstock stickers from the Special Delivery Collection and some Doodlebug Boutique Buttons for extra texture.


Let's take a look at the finished layout!


That is it for today. I hope you guys enjoyed this post and liked the ideas I shared. If you have any questions just leave a comment below or send me an email. I'll be happy to help you.

Have an awesome day!


Doodlebug Products Used: 
Special Delivery Collection
Doodle Cuts - Mini Tags

Other Products Used:
Vellum Paper
Foam Dots

Wednesday, July 1, 2020

LAND THAT I LOVE 8.5 X11 LAYOUT | with Maryám

The new Land That I Love collection from Doodlebug Design is full of red, white, and blue elements, as well as different patriotic icons that were designed to document all of the 4th of July activities in the United States. But did you know that this collection can also be used to celebrate some other countries? I am from Chile and lucky for us, we share the same colors of the American flag, which means I can use this collection to document our own patriotic celebrations too. Isn't that fun?!

For today's layout, I wanted to document a photo from a typical dish of the Chilean cuisine (Empanadas) that my mom made a couple of years ago to celebrate Independence Day. After I printed my photo, I started by looking through the papers from the collection and I choose the "America the Beautiful" and cut a piece 3.5 x 11" inches from it. Next, I grabbed my Craft Pick Tool and punch some holes around some of the hearts of the paper to add some hand-stitching details.

Next, I decided that my layout need some more texture so I grabbed the Mini Pinwheels Craft Kit and build three cute pinwheels for my layout and added a little sprinkleTM in the center. Even though these pinwheels are not from the Land That I Love collection, they match perfectly well with the line and they also add a nice touch of dimension to the page.

To continue with the process, I started adhering everything down and also added some embellishments- mainly cardstock stickers and sprinkles- to complete my design. Lastly, For the title, I decided to use one of the banners from the Odd&EndsTM set which says- "Hooray for the red, white & blue".

Let's take a look at the finished layout!

That is it for today! I hope this layout has inspired you to think of creative and different ways to use patriotic collections.

Thanks for stopping by. Have an awesome day!

Doodlebug Products Used: 
Land That I Love
Paper Frills - Lady Bug
Mini Pinwheels Craft Kit

Other Products Used:
Embroidery Thread
Vellum Paper
Foam Dots
Liquid Adhesive

Wednesday, June 17, 2020

PARTY TIME - THE BIRTHDAY BOY 8.5X11 LAYOUT | with Maryám

A couple of months ago we celebrated my grandpa's 82nd birthday! We had a great day celebrating him and I wanted to document this big milestone in a layout. The collection I used for my project was Party Time because it was perfect for this occasion.

To create my layout, I started out by printing two big numbers- 8 and 2- onto an 8 x 10.5" inches white sheet of cardstock. I then carefully fussy cut them and used the negative pieces (A) as a template to trace the numbers onto another sheet of white cardstock (B) with a pencil.
Next, I grabbed some IconsTM and Mini IconsTM stickers and sprinklesTM from the Party Time collection and started to fill the numbers from cardstock (B). Once I finish I erased the pencil marks and adhered the negative piece (A) I cut earlier over the one with stickers (B).

Continuing with the process, I trimmed the Party Time Patterned Paper to 8.5 x 11" inches and adhered the cardstock (A&B together) with the numbers now completed. 

Following up, I added my photo and positioned it over the bottom part of the layout. Since I had already added a bunch of elements to the numbers, I tried to kept the rest of the page pretty simple. I only added a few Chit ChatTM Pieces from the same collection and the date of the photo.
For the title of the page, I used a banner from the Chit ChatTM set that reads "The Birthday Boy!" and placed over the bottom part of my photo. I then added some more sprinklesTM and a few star stickers and that's it!
Let's take a look at the finished project!
I really enjoyed working with the Party Time collection. I hope you guys enjoyed this post too and liked the ideas I shared. If you have any questions just leave a comment below or send me an email and I'll be happy to help you.
Have an awesome day!


Doodlebug Products Used: 
Party Time Collection

Wednesday, June 3, 2020

HEY CUPCAKE LAYOUT | with Maryám

Have you seen the Doodle-CutsTM from Doodlebug Design? I was so excited when I received the new collection of wafer-thin stand-alone dies in the mail- so many shapes and designs that I had no idea which I was going to use first.

If you've seen some of my previous work, you know how much I love to include floral and leafy elements in my pages, and this layout is no an exception to that. The new Nesting Scallops Doodle-CutsTM, besides the beautiful scallop dies, comes with a flower and leaf too which was perfect for the idea I had in mind. 

To create my layout I started out by die cutting flowers in different pattern papers from the Hey Cupcake and Party Time 6 x 6 Paper Pad. Next, I took a sheet of Sugar Coated Cardstock (also known as glitter cardstock) in Pistachio color and cut some leaves. I then cover the center of the flowers with a circular piece of vellum and added a sprinkle from the Birthday Girl Assortment in the center of each one of the flowers.

To glue the pieces in place, I used foam dots, and for some others, like the vellum leaves, I used liquid adhesive.
For the title, I gold heat embossed the word "happy" from the Happy Birthday Stamp Set, and then using black pigment ink, I stamped "birthday" from the same set.

Lastly, I added some more sprinklesTM and also JewelsTM from the limeade and cupcake assortment. In addition, I gold heat embossed some little flowers from the Birthday Girl Stamp Set from the Hey Cupcake Collection and put a cut doodle-popsTM girl on the right side of my photo.


Let's take a look at the finished layout!

I  really enjoyed working with metal dies so creating this layout was super fun. I hope you guys enjoyed this post too and liked the ideas I shared. Also, don’t forget that if you have any questions just leave a comment below or send me an email. 

Have a great day!

Doodlebug Products Used: 
Hey Cupcake Collection
Doodle Cuts - Large Tags
Doodle Stamps - Nesting Scallop
Doodle Stamps - Happy Birthday
Doodle Cuts - Birthday Girl
Sugar Coating Glitter Assortment 
Doodle Twine - Gray
Jewels - Limeade Assortment
Jewels - Cupcake Assortment

Other Products Used:
Vellum Paper
Embossing Powder
Embossing Ink
Foam Dots
Liquid Adhesive
Pin It button on image hover