Showing posts with label Courtney. Show all posts

Wednesday, November 23, 2016

Family Traditions: Little Pumpkin DIY Shirt & Pillowcases by Courtney

HELLLOOOOOOO out there! :) Have you been enjoying the new Doodlebug Flea Market cut files!?! WE LOVE THEM!!!! Courtney Lee from Court's Crafts here with a new family tradition for us!

So our "assignment" (I always put "assignment"s in quotes as I LOVE to play!!!) was to use Flea Market cut files to create a Thanksgiving 3D project. 


At first I was going to make the onesie say "My First Thanksgiving" but then I wanted to use it a ton so I changed it to little pumpkin. :) I thought this would make a super cute hostess gift! If you are going to someone's house for Thanksgiving and they have children from big to little, here are some ideas!

I used the pumpkin from the pumpkins and acorn cut file. Isn't it darling? My little pumpkin looks so cute in this! :) 

Here are the pillows and the story behind them. So my cousin's mom made her kids pillowcases for the seasons and they loved them. Now she does it for her kids too. I thought it was adorable and decided to give it a try. The girls LOVE their pillows!!! 

These are the first pillowcases I have ever made! I think they turned out so adorable! :) And the girls love love love the iron on pumpkin and acorn. 

Here are the three projects together. If you have kids or grandkids, I encourage you to try this! It's SO fun and personal and they will LOVE it!!!

I layered on the iron on just like you would a die cut. Just make sure that you cover the whole image with each layer so that the iron never touches the iron on directly.

This little pumpkin and her sisters LOVE their pumpkin pillows! I cannot wait to make Christmas ones using the Here Comes Santa cut files! :) 

Recipe:
Doodlebug: Flea Market: Pumpkin and Acorn cut file (Silhouette Store = Silhouette cut file)
Doodlebug: Flea Market: Pumpkin and Acorn cut file (Lori Whitlock's Store = SVG)

Friday, November 11, 2016

Petite Prints Challenge: Card Set by Courtney

So.... The new petite prints by doodlebug are AWESOME. Courtney Lee from Court's Crafts here and I have used them all over the place!!! But for this project I really wanted to showcase the new gingham-linen patterns. 

I utilized the 6x6 paper pad (oh yes, it comes in a 6x6 paper pad too!!!!) 

I added those awesome cardstock stickers for the sentiments (I seriously cannot get enough of these and the fun colors they come in).

I LOVE the new cute clips and put them on my projects EVERYWHERE. They are hiding all over the place and they are not only a fun element, but they also add a really nice texture to the projects. AND the recipient can take them off if they would like to and use them! :) Bonus!

Then I added some cute shaped sprinkles within their color dots and I finished it off with some glittered and matte sprinkles. I love how doodlebug makes all three kinds!


Recipe:
doodlebug: cardstock stickers: thank you multicolor (3131)
doodlebug: cardstock stickers: happy birthday multicolor (3128)


Thursday, October 27, 2016

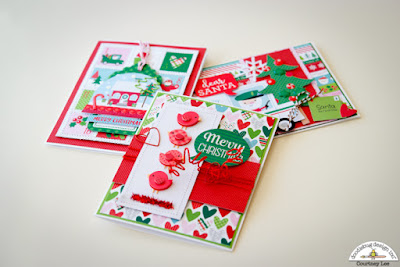
Here Comes Santa Claus: Three Cards by Courtney

It's Beginning to Look a lot Like Christmas

My mom calls and sings that song after she has found a Christmas present and wont tell me what it is! Courtney here from Court's Crafts with three Christmas cards to jump start your creativity. 


Te first one was totally inspired by those little birds. I LOVE THEM!!! 

This heart background paper is my new fave and I just had to get it in as the background of the card. The heart Cute Clips were JUST the thing needed. There is even one hiding in the wired ribbon!  I grabbed my daughter's tinsel pipe cleaners (shhh.. don't tell!) and snipped a bit off to ground my birds - like birds on a wire. :) 


This is one of those cards that comes together organically and quickly. I took out the snow globe (Odds and Ends) and I cut the sentiment out from the 6x6 paper pad. And then they sat on my desk together...for like a week. haha. Then I saw this advent calendar paper and wanted to make something different (I was going to make a door hanger countdown thingy) but then I thought... quilted background!!!

Or maybe I should call this a faux quilted background as I just stitched in between the squares making it look like that! I added a border strip from This and That, a scrumptious candy cane sprinkle and a paper clip to the snowglobe and attached them all to a tag. Sweet! 


Dear Santa
For this card I really wanted to decorate a Christmas tree.. somehow that turned into this. lol. The creative process sometimes cracks me up and I was totally cracking up at myself as I put this together. 

Those candy swirl sprinkles though!!! And did you see Santa's candy cane exhaust? haha. Most of these were die cuts from the Odd's and Ends. :) 

I hope this inspires you to break out your Here Comes Santa papers early and have some holiday fun! I LOVE Christmas!!!

Tuesday, October 11, 2016

Doodlebug Design Silhouette Cut Files: Spooky Cards by Courtney

I have been BURSTING to tell you all that Doodlebug is now making cut files!!!!

This is Courtney Lee from Court's Crafts here and I made these awesome shaped cards with the new Boos & Brew cut files! They are SO much fun and I am so thrilled that I can cut these awesome critters again and again!!!
Here is my biggest boast for doodlebug cut files (and if you know me, you know that I use cut files 99% of the time... in other words I have cut a lot from a lot of different companies.): doodlebug ROCKED the depth of the cuts. They took the time to put a whole character together and everything has amazing detail. It makes it so easy because you just have to pick the papers and add foam dimension. ... scroll down to the haunted house to see what I mean a little easier. 

They also made the layering on these excellent. They worked from back to front so there is always an outline of the full cut to build on. YES!!!

Okay, seriously... how cute are these cut files... I'm dying over here!!! :)

I zig zag stitched around the pumpkin and I grabbed an old happy Halloween sentiment sticker from doodlebug and curved it around the pumpkin. perfect. 

Check out the spider in Igor's hair!?! I used some googly eyes on the frog. I thought it made him look a little dorkier. :) And I added a matte sprinkle as a wart. ;) The petite prints were perfect for the froggy elements.

Here is what it looked like all done and you can see the shaped card background. :)

Recipe:
doodlebug: boos and brews: frankie's lab (5379)
doodlebug: boos and brews: spooky spiders (5380)
doodlebug: boos and brews: sprinkle shapes: spooky spiders (5318)
doodlebug: swiss dot 6x6 paper pad (5449) (orange shirt)
doodlebug: petite prints: grasshopper gingham linen (5435)
doodlebug: petite prints: citrus gingham linen (5433)


Oh Doc, you had me at hello. I am married to a total nerd and I love it. This guy.. ahh! 

If I could have fit a little pocket protecter on this guy I would have but an eyeball in the middle of his bow tie was the perfect touch. I added a matte sprinkle to his hands for emphasis and dimension and my favorite addition was the two different sized googly eyes. 

This eyeball jar is SO much fun. from the bubbles to the colors, doodlebug ROCKED the depth of this cut. 

recipe:


My final shaped card for you today is this AWESOME haunted house, Frank, and his bride. 

I LOVE doodlebug's haunted houses. I look forward to them with every halloween release. So I was SO excited to use this cut and add some sloppy stitching to make it feel really run down and patched together.

I also skewed the windows (because you can do that with a cut file!!! :)) and added some fun elements.

Did you see the eyeball as the ball on the top of the spire? And of course frank needed a doodle-pop bat in his belfry (I know I know, there are no bells up there but still... )


recipe:
doodlebug: petite prints: citrus gingham linen (5433)
doodlebug: mini pearls: lilac (3349)


I really hope you had SUCH a great time checking out this Boos and Brews cut file projects!!! Now hop on over to the Silhouette store and pick them up! ahh!!! SOOOO much fun!!! :)

Monday, August 22, 2016

Kid's Craft Challenge: Clip Up Photo Board by Courtney

Kid's crafts week!!!! Courtney Lee from Court's Crafts here!

I was really excited to pick one of the (all too many) projects that I have had to my head to do with my little humans. They LOVE doodlebug washi tape maybe more than anyone on earth. I am surprisingly stingy with it so when I brought 48 rolls of washi tape out and told them we were going to play with it... needless to say they were STOKED. 


I used to have a banner with their direct family and godparents on it in their room. They loved it and it was a way to keep them close. It was cute but it didn't hold that many people and it was now really outdated. So I printed out these little 2x2 pictures and went to work. 

They LOVED this Kitten Smitten collection so I knew it was the one to use. First they helped me cover the clothes pins (no joke, they did some themselves at 2.5 and 4 (she just turned 4 last week!)). They are very detail oriented little humans. 


Then I put all the small die cuts from the Odds and Ends out on the table and they got to choose which ones to put on the clothespins (and the orientation of the die cuts). I adhered the die cuts with dimensional foam tape and they were VERY proud of their creations.

Check out my oldest. She just turned 4 a couple of weeks ago. This was her idea for a photo shot... I think I see a next generation doodlebug!


Next it was time for adult help. I cut the 2x2 pictures apart (I print them out as a 4x6 photo) and there were already 4 perfect polaroid frames in the Odds and Ends. I used those first and attached the pictures to the back of the frames using washi tape. The bottom right one in this picture - the pink hearts is one of those die cuts that comes in the Odds and Ends.


After that I found a polaroid frame in my Silhouette arsenal of die cuts, resized them to fit, and I arranged it so that three or four were in each 6x6 inch quadrant. I put the four patterned papers from the 6x6 paper pad in the four quadrants and so I was able to cut them all in one pass. YES! 

Lastly I had this board in the kitchen and I added all the photos to the wire. I added the "family" using chippers in swimming pool.


This would also be super cute on one of those chicken wire frames or simply by getting an empty photo frame and stringing twine across it. CA-UTE!


Recipe:
doodlebug: washi tape: scallop assortment (4800)
doodlebug: washi tape: gingham assortment (4803)
doodlebug: washi tape: dot assortment (4802)
doodlebug: washi tape: stripe assortment (4801)
doodlebug: kitten smitten: 6x6 paper pad (5298)
doodlebug: kitten smitten: odds and ends (5244)
doodlebug: chippers: swimming pool (4515)

Tuesday, December 2, 2014

Hot Cocoa Gift Set for your Neighbors

Hi everyone! Courtney from Court's Crafts here with an idea for your neighbor gifts this year! 

I saw something similar to this and knew it needed some doodlebug cuteness!

So... I have been using up these holly berries and I will miss them when they are gone! But I love the fact that they will bring smiles to other people's faces. :) So I send them out with love. :)

I used the pixies as stirring straws (and they can use them as real straws! They are food grade!) I attached jingle bells with washi tape

Did you see the tags that come with the Santa Express collection? Easy peasy! I used a gumdrop sticker from the "icons" to anchor it down. 


doodlebugs used:

Tuesday, July 15, 2014

Chevrons to Decorate Doors and Notebooks

3D Monograms 
by Courtney Lee

Hey hey! So.... we were "assigned" (as if it's a chore!!! ;)) sugar coated chevron card stock to play with this time! I have had these cut files at the ready for a little while now and couldn't wait to put something on the girls' room door to identify it as both of theirs. I love ampersands so I had to get one of those in there too. :) Courtney from Court's Crafts here with a little door decor! 

Hans (my husband) hasn't really let me put stuff on the girls' door. He is totally non committal and wont let me do it! He has vetoed almost everything... and then I made these. :)

My girls' names are Emmaline and Charlotte and I am totally enamored with everything "sisterly" as I was an only child. I wanted to make their monograms equal and opposite and since doodlebug makes everything in their "classic colors", I was able to do just that! 

Of course I needed a little gold thrown in there. It's so *hot* right now. :) 

And if you look closely - behind the gold - is tone on tone white chevron card stock

I love butterflies and their room is very "nature" themed and I thought that the spinkles vellum would look cute on top of the chevron so I double cut the butterflies and adhered them at the thorax. 

Lastly, I added three pearls for accent at the bottom right of the letters. 

Here it is on their door! 

I had to get a picture so that you can see just how sparkly the sugar-coated card stock is. I know that when I see glittered card stock I am sometimes not too impressed with the amount of glitter on the card stock. I like it to SHINE! And no surprise here - doodlebug card stock does just that! Check. Out. That. Glitter!

Thank you so much for checking out my sugar-coated-chevron project! Make sure to check out how you can WIN SOME! :)

This is Court's Crafts signing out! Have a beautiful day!

recipe:
"C"

"E"

"ampersand"

Altered Book Cover
by Sharm Nidyanandan
Recently, we celebrated both our little girls birthday. What I wanted to make was a little notebook where our guests could pen down their message for my little girls to ponder upon when they're older. 

As with every little girl's birthday, all things glittery is a must :) So what I did was, to alter a little book that you can get from any dollar store and bling up the front cover with the very lovely chevron cardstock. 

 Here's what my project looks like:


Some close-ups


Instructions:
1) Cut out a piece of chevron cardstock to cover the entire front page of the book leaving about 0.5 inches all around

2) Next, cut out a smaller piece of a different colour and use an edge punch to create a pretty border (you can also use one of the cutesy border stickers by Doodlebug ;))

3) Layer some stickers and make your own banner using the same chevron cardstock and add some bling and twine

Materials Used:
Item:4087 12x12 lily white chevron sugar coated cardstock
Item:4088 12x12 gray chevron sugar coated cardstock
Item:4078 12x12 bubblegum chevron sugar coated cardstock
Item:4185 sugar shoppe this & that sticker
Item:3208 doodle twine - bumblebee


Pin It button on image hover