Showing posts with label Day to Day Collection. Show all posts

Friday, January 20, 2023

DAY TO DAY AUGUST CALENDAR | with Kathy

Have you enjoyed the Design Team's Day to Day inspiration?  There are so many ways to use this collection... you can use it as a planner, a way to document your memories... they would even make a fabulous calendar gift with photos for friends and family!  I'm completing our posts with the month of August!  Summer is a fun time in our world... we spend our weekends with friends and family on the water! Again, I used the Day to Day collection as a way to document our activities.  Take a peek...


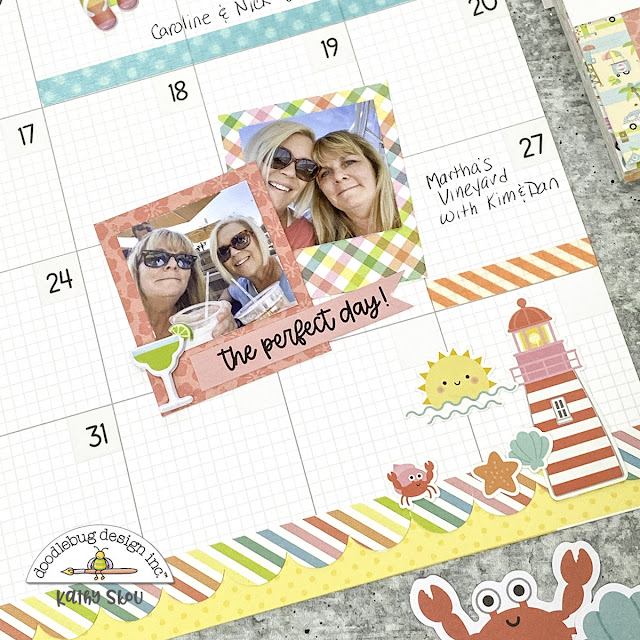
I used elements from the Seaside Summer Collection to embellish my calendar.  I also used my Insta photo trick, as I did on my July Calendar.  It's really easy to get this look.  I printed my photos 1.5" square.  I then cut papers from the Seaside Summer 6x6 pad and some petite prints to be 1.875" x 2.25", and then positioned my photo on the upper part of the paper to get the look.


The great part of these calendars is there is a lot of space to "play."  You can decorate the top banner of the page, and also the blank days of your calendar.  I used the water stamp from the Seaside Summer Doodle Stamps and some fish from the Mini Icons to add some fun to the open space.


In addition to the Mini Icons, I used a lot of the Seaside Summer Puffy Stickers to add some dimension to my layout.  That board was the perfect way to embellish the photos of my daughter & her boyfriend paddleboarding!


The word stickers on the This and That Cardstock Stickers are perfect as captions for your photos! And that margarita puffy sticker... perfection!


I added a bit more color to the bottom banner using one of the 12" stickers from the This & That Sheet.
I've had so much fun with these calendars. So much so that I'm planning a 2023 album featuring a page a month!  I think it would be a fun way to keep up with my monthly scrapbooking!  That's it for me today, thanks for stopping by to peek!


DOODLEBUG PRODUCTS USED

Day to Day Collection
Seaside Summer Mini Icon Stickers
Seaside Summer Puffy Stickers
Seaside Summer This & That Cardstock Stickers
Seaside Summer 6x6 Pad
Petite Prints
Candy Stipe Washi Tape - tangerine
Stripe Washi Tape - bumblebee
Polka Dot Washi Tape - swimming pool


Wednesday, January 18, 2023

DAY TO DAY MAY CALENDAR | with Miguel

I'm happy and excited to start a new year 2023 creating with Doodlebug's Day to Day collection. I chose the month of May, since for me it is a very special month and what better than keeping important dates in mind in a special way.


In my calendar I've marked the dates of Mother's Day, the birthday of one of my best friends and of course my birthday. Definitely a month of many celebrations!


I cut frames with Doodlebug petite prints papers and placed photographs in them to make the dates more special.


I finished decorating with some Fairy Garden mini-icons and some Doodlebug washi tape and I loved the result. I hope, as always, my work inspires you and encourages you to organize your year. see you soon!


DOODLEBUG PRODUCTS USED

Day to Day Collection
Fairy Garden Mini Icons
Petite Prints
Washi Tape

Friday, January 13, 2023

DAY TO DAY NOVEMBER CALENDAR | with Cynthea

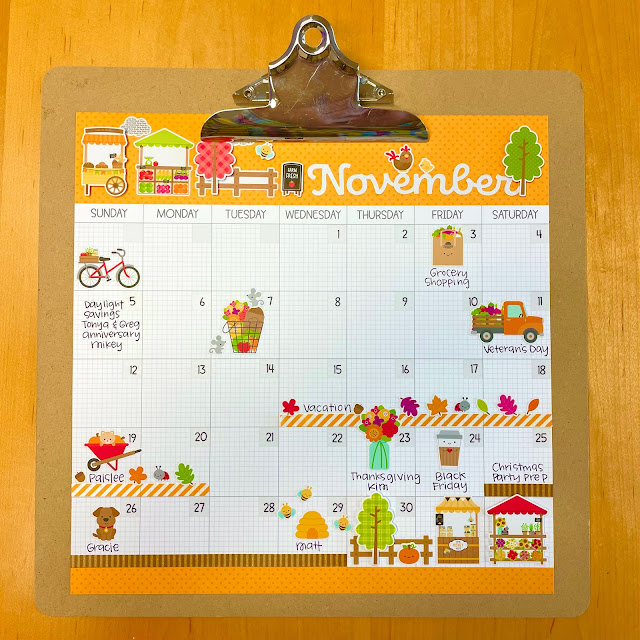
Cynthea is back again today with her November Day to Day Calendar!  We love all of the sweet details, we can almost smell the apples in the air!


Cynthea used the Tangerine calendar sheet as her base.  It's embellished with lots of stickers from the Farmers Market Mini Icons, and some striped washi.


Placed all on the Natural Clipart Clipboard, she's all organized for the month!

Keep checking the blog over the next week for more Day to Day Calendar inspiration!


DOODLEBUG PRODUCTS USED

Day to Day Collection
Farmers Market Mini Icon Stickers
Striped washi tape
Natural Clipart Clipboard


Friday, January 6, 2023

DAY TO DAY APRIL CALENDAR | with Cynthea

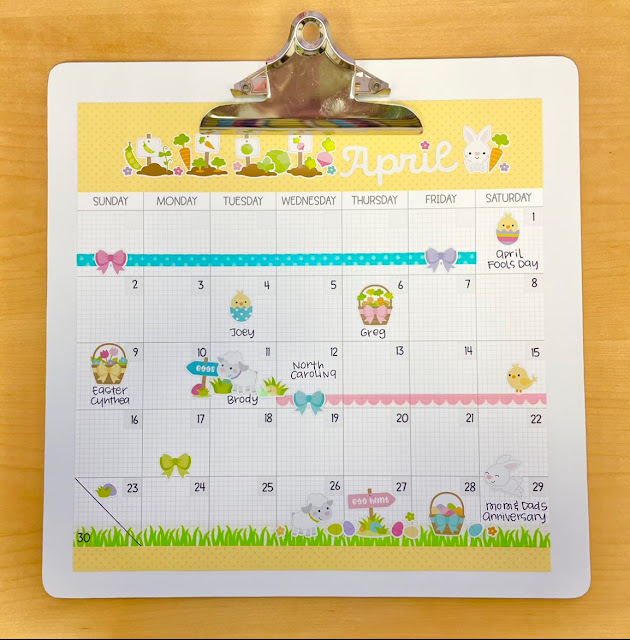
We have another fabulous Day to Day Calendar layout from our most wonderful Owner/Creative Director Cynthea today!  Check out her amazing take on the month of April!


Cynthea started with the Bumblebee Day to Day Calendar base.  She then decorated it for the season using the Hoppy Easter Mini Icon Stickers and Polka Dot, Scallop and Green Grass Washi tapes!

It's all held on one of our fun Clipart Clipboards!  These boards are great to display our calendar pages and could also be used to showcase your favorite layouts!

Be sure to keep checking back for more Day to Day Inspiration from the home office and the Design Team!  Have a great day!


DOODLEBUG PRODUCTS USED

Day to Day Collection
Hoppy Easter Mini Icon Stickers
Green Grass Washi Tape
Scallop Washi Tape - Cupcake
Polka Dot Washi Tape - Swimming Pool


Thursday, May 28, 2015

DOILIES: Card Set by Wendy Sue Anderson

Hello Doodlebug Friends!  It's Wendy Sue here with you today - and it's my turn to share some of my latest  projects created with Doodlebug Doilies!  I love using the colorful doilies (in BOTH sizes) on layouts, gift packages, and especially cards.  I created this card set using one of my all-time favorite collections, "Day to Day."

After creating two card bases from white cardstock, I layered on several different patterned papers from this collection.  Then I chose two coordinating doilies to add on top of the papers.  One of my FAVORITE things about Doodlebug products is how they all coordinate.  From the very first collections they created, to the latest papers rolling off the press, the colors are consistent...which means the embellishments can be mixed an matched and used with all of the collections!


For this card set, I chose to use swimming pool paper doilies and bon bon mini doilies.


After layering the doilies, I added some stickers, pixies, and sprinkles.


To finish things off, I tied bon bon doodle twine around the pixie sticks.


Now it's your turn - choose some of the new doilies and pull out one of your favorite doodlebug collections - old OR new - and get to work!  I can't see what YOU come up with - be sure to link your projects in the comment section below!

Friday, November 8, 2013

Inspired by Pinterest: Happy Together Layout by Stephanie

Hey! It's Stephanie here with my Inspired By Pinterest layout. For this assignment we were asked to design a project inspired by a pin on one of the Doodlebug boards. I chose to do Wendy Sue's Lovebirds grid layout.
Here is the link to her project:
 

I was inspired by the squares in her layout and how each of them held little scenes of cuteness. It was fun getting to use many of the different patterns found in the Day to Day Collection.


In her layout I liked how even though there was lots going on with papers and different embellishments the pictures still stood out. I tried to do this by using pictures with predominantly a bold red, I found it helped draw your eyes to the pictures first and then the fun bits and pieces here and there. 


Here is one more close up so you can see the details of my layout better:


This was my second time getting to use a picture for layout inspiration and it was so much fun. Like a sketch it takes so much of the guess work out and made the process so much enjoyable instead of stressing to make your own unique design. If you haven't used a picture as inspiration for a layout or card, you should totally give it a try.

If you aren't already, you should be
following Doodlebug on Pinterest.


Tuesday, October 29, 2013

Tutorial Tuesday: Day to Day "Besties Layout"

Hi everyone! Jodi here today to share with you a layout with instructions and photos to complete your own layout at home!

Here is what you need to get started:

Materials:

1 sheet of white cardstock
1 each of Day to Day Papers- bow ties, sunnyside lane, you + me, oh snap
Day to Day This & That Cardstock Sticker
Day to Day icons  cardstock sticker
Day to Day say chees Doodle-pops
Day to Day Doodle Twine (red)
Day to Day Icon minis- hipster, anyway
Washi Tape: This Way; Ladybug Dot
Yellow Pixies
Simply Sweet Ladybug Alpha Stickers

Other Tools Needed: 
Scalloped Border Punch, 1 3/4 Circle Punch, Large Heart Punch
Adhesive: Foam dots, Tape Runner; Glossy Accents (or fast drying glue)
Two- 4 x 6 Photos (vertical)

Step 1:  I love using white cardstock on layouts, in order to make the colors really pop on my layout pop.  Start by cutting a piece of white cardstock:  9 1/2 x 11 1/2.

Step 2:  I love using washi tape to create borders on my layout. Doodlebug has such a great variety that matches perfectly with each collection!  For this layout I added two different colored borders- Ladybug dot at the top of the white cardstock, and the This Way tape on both longer sides as shown below:


Step 3:  Center the White cardstock onto the teal side of the oh snap patterned paper.


Step 4: Punch out two scalloped borders that are approximately 1/2 x 11 1/2. Adhere these to both sides of the This Way Tape.


Step 5:  Make the following cuts:  Bow Ties Patterned Paper- 12 x 3; You & Me Paper- 12 x 1 1/2; Sunnyside Lane Paper- 12 x 3/4.   Make a V-cut at each end of each paper


Step 6:  Layer these three sheets as shown below.  Leave approximately two inches of white cardstock showing at the bottom for embellishing. Add two 4 x 6 photos, so they are centered, and the bottom of the pictures are just above the sunnyside lane patterned paper.


Step 7: Creating the Sun embellishment.
  • Punch two circles from the sunnyside lane paper. Adhere one of these in the top left hand corner
  • Cut several pixies ranging in length from 1/2 to 1 inch.  Apply a wet, fast drying adhesive to the circle already adhered to the paper. Arrange the pixies to create rays of sunshine. 
  • Add more wet adhesive to the second circle and adhere on top of the pixies, and first circle. Allow to dry.

Step 8:  Add stickers from the Day to Day this and that. use foam dots for one hear and the red cloud. Add your title using the simply sweet stickers. Add the four photo corner stickers.


Step 9: Wrap three pieces of twine around the the layout where the sunnyside lane v-cut paper is, and add a bow with the two tags attached


Step 10: Add the rest of the sticker embellishment. Use the doodlepop camera and layer with a heart punched from the you & me Patterned paper.


The final layout:


Stop by my blog for other creative ideas!

Thanks,
Jodi


Sunday, September 15, 2013

Day to Day Collection: Winners Announced

Oh my goodness, we love how Melinda can take all her left over embellishments and create something amazing. We have had so much fun featuring the new Day to Day Collection this past week that we couldn't wait to share this one and announce our WINNERS (scroll down to see if you're one of them).


Wee Bit of Heaven Layout
By Melinda Spinks


Melinda says she has really fallen in love with the whole concept of collage style scrapping and has again created another centrepiece for her project using all the gorgeous Day to Day embellishments.


Melinda has added a Doodlebug Expressions rub-on verse as her heading and completed the whimsical theme of the layout by deep-etching the photograph and hand stitching cloud clusters.


Thanks for checking out Melinda's amazing layout featuring the Day to Day Collection. The winners of the Home for the Holiday's packages are...
Chark
Karen Ladd
Ange Weisbeck
Please email us your shipping information at doodlebugdesign.blog@gmail.com by Wed. Sept. 18th to claim your prize. Please put in the subject line of your email "Home for the Holidays Collection". Thanks for your continued support!!

Friday, September 13, 2013

Day to Day Collection: Layout Inspiration Day 2

Everytime I look at the new Day to Day Collection I see something new I missed before or come up with a new idea on how to use the papers, stickers and darling embellishments.

And I wish I could win it like a few lucky fans! Don't forget to SHARE THIS POST any way or place you'd like. Check the blog tomorrow to find out if you're a winner.

So Happy Together
by Monique Liedtke

What I love about this collection is that it can be used for photos of really every single occasion! In this case I used a photo from our summer vacation last August. Because I love lots of layers and combining many different patterns and colors I decided to change my color photo to black and white. I really love how it turned out. My favorite Doodlebug products right now are the new sprinklers and the pixies!! I could use them on every single project!


Goof Ball Layout
by Tiffany Hood

Day to Day is such a fun collection.  The cameras and mustaches and glasses reminded me of these pictures of my son from a few years ago.  He loves to ham it up for the camera, and he's done it his whole life.  He's such a goofball.


Pin It button on image hover