Showing posts with label Fall Memories. Show all posts

Wednesday, November 20, 2024

FARMHOUSE THANKSGIVING LAYOUT | with Erica

Hi friends! Erica here today sharing a 12x12 layout using the Farmhouse collection!


I wanted to create a simple clean design but add a pretty detail under my layers with one of my favorite border punches!

I started with a 12x12 piece of Lily White Textured Cardstock. I cut out some strips of pattern papers from the Farmhouse collection. Starting with 2.50" x 12" and adhered along the left side of my layout about and inch and a half in from the left. I tucked in two border punched strips in the layers and I love the little detail it adds to the layout.

Next I created a photo mat to go horizontal on my page with some of the Farmhouse coordinating textured cardstock . Next I added one of the border stickers from the 12x12 Farmhouse sticker sheet.

To finish up the layout I created two embellishment clusters with Farmhouse Odds & Ends, Icon stickers and some shape sprinkles!

Thank you so much for stopping by the Doodlebug Blog today! I hope you enjoyed my layout and give this simple design a try!

DOODLEBUG PRODUCTS USED

Farmhouse Collection
Farmhouse Coordinating Textured Cardstock

OTHER

Border Punch

Monday, November 18, 2024

FARMHOUSE HOME LAYOUT | with Brianna

Hey friends!! I'm so happy to be bringing another layout to y'all using the new Farmhouse collection. As the Thanksgiving holiday quickly approaches, I love to look back on the past year and think about all of the moments I'm grateful for. This photo of my sweet girl being one of them! I'm so grateful for everyday moments like this. Here's my page:

To start, I took the Farmhouse 12x12 paper and used it as my base. I then took a piece of white cardstock and trimmed it down to an 11x11 and matted it with the Country Calico paper that I had trimmed to a 10x10. I love layering papers together like this!

I needed another piece of cardstock to ground my photo, title and embellishments, so I took the Swimming Pool DB cardstock and cut out a banner shape. I popped it up on foam tape and adhered it towards the bottom of the page. I pulled a large floral piece from the Bits and Pieces pack and adhered it down in the right corner. My photo is a 4x4 that I trimmed to resemble a polaroid photo and I tucked it into that floral piece.

I chose the large 'Home' piece from the Chit Chat pack for my title. The black and white pattern really pop on this page and I think it was the perfect choice. I also layered a few floral bits to the top left of it.


I needed an embellishment cluster at the top right of my photo so I tucked in a tag from the Bits and Pieces pack and tied some Doodlebug Twine through it. Next, I pulled in a few bits from the Odds and
Ends pack and tucked them into the cluster as well.

Next, I added some smaller elements using a few Puffy Icons stickers as well as a few Fall Flurry Shape Sprinkles stickers.


Here's one last look at this sweet, Fall themed page:


Thanks so much for stopping by today, I hope that I've inspired you in some way! I'll see you in my next post friends!


BLOG INSTAGRAM | YOUTUBE

DOODLEBUG PRODUCTS USED

Farmhouse Collection

Saturday, August 31, 2024

FARMERS MARKET SO HAPPY LAYOUT | with Tarrah

Do you love flowers? If the answer is yes then read on! Today I am sharing a new scrapbook layout featuring the gorgeous Farmer's Market collection!


For this layout, I created a round wreath of flowers and leaves and I love how it turned out. I mainly took flowers and leaves from the Bits and Pieces die-cut pack. I chose the 'B' side of the Fall Berries patterned paper as my background paper and adhered the larger flowers in a circular shape using foam tape to add dimension. I arranged the large flowers so that not all the flowers of the same style and color were together.


Once the large flowers were placed, I added some of the larger leaves also from the Bits and Pieces pack, again making sure not to have the same ones too close together, this helps to draw the viewers eye around the wreath instead of drawing it to one particular area.


I placed my photo on the right-hand side, inside the wreath, adding foam tape, a note card and tab die-cut also from the Bits and Pieces pack underneath. My title is from the Chit Chat die-cut pack and this is also popped up using foam tape.


When all of the larger elements were placed on my layout, I then went ahead and added some of the smaller elements including more small floral die-cuts and some of the cute enamel shape Sprinkles on top of some of the florals and also peeking out from underneath the wreath too. Lastly I stamped the date stamp under the title and sprinkled some white mist.


Thank you so much for stopping by today! I hope you are inspired to make your own wreath using the Farmer's Market collection.


DOODLEBUG PRODUCTS USED

Farmers Market collection

OTHER

White Mist
Black Ink
Date stamp

Tuesday, August 27, 2024

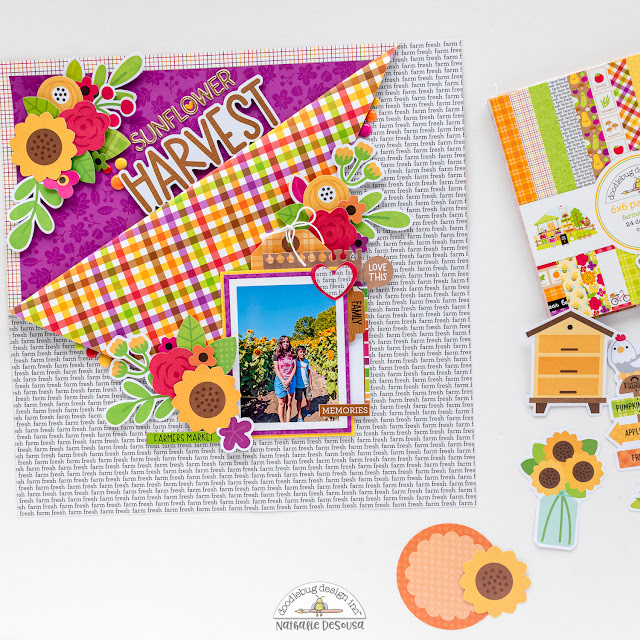
FARMERS MARKET SUNFLOWER HARVEST LAYOUT | with Nathalie

Summer is coming to an end, that means time for harvest, pumpkins, and cozy weather. So, what better way to start documenting all those fun memories with the fun Farmers Market collection. Let's check what I have created.


I just love the colors in this collection, and they were perfect to document this photo of my niece and nephew at the Farmer's Market during Sunflower season.


I started with the Farm Fresh Paper, I loved the two sides of the paper, so having the corner fold helped me to showcase the two designs, while creating a focal spot for the picture. I then backed the empty space with a selection of contrasting papers from the collection,


I backed the photo with papers from the 6x6 paper pad, and set it at the end point of the folded paper's corner. I decided to use the edges of the fold to aid me on creating floral clusters for the page.


I added a few pieces from the Odds & Ends, and Bits & Pieces behind the photo. This layers help to make the picture pop amongst all the flower embellishments.


For my title, I am using the space above the folded edge to build a floral cluster and also place the title. The angle of the folded piece of paper was the perfect spot to add my title (Chit Chat pieces and Alphabet Soup gold puffy alphas)


To finish my page, I added a few extra sprinkles around the floral clusters. I just love how it all turned out, and I hope this inspires you to check the beautiful Farmers Market collection. XO


DOODLEBUG PRODUCTS USED

Farmer's Market collection
Gold Alphabet Soup Stickers

Pin It button on image hover