Showing posts with label Gingerbread Kisses Shadowbox Insert Kit. Show all posts

Sunday, December 3, 2023

GINGERBREAD KISSES WREATH | with Tya


Hello there friends! Welcome to December! Wow - has this year just flown by! For my post today, I am sharing a fun and festive home decor piece with you! It's just in time to add to your decorations this year! I love making all sorts of wreaths and knew when I saw the Gingerbread Kisses collection, I wanted to make one of these candy cane wreaths! I knew it would be a great way to showcase all the yummy candy in the collection.! I also repurposed the "Shadow Box Insert Kit" to be the decoration in the center of the wreath! You don't always have to put those in Shadow Boxes!

So to make my wreath I used the following products:

-Gingerbread Kisses Shadow Box Insert Kit

-Candy Canes- these are the "Elf" Movie-themed ones that are out in stores now. I loved how the candy cane colors are perfect matches for the Gingerbread Kisses collection!

-an 8 inch foam wreath form - picked this up at the Dollar Store

-(2) 10 inch circle canvases

-Buttons and white twine

-Red Dot Ribbon- 2 spools

-For the decorative tag on the left side of the wreath, I layered a flower, some mesh ribbon, a fun cookie decoration, some greenery, a button, and twine and the cute "Merry Christmas" banner is from the Chit Chat.

-burlap twine

- Hot glue

To start I laid out one of the circle canvases and then arranged my candy canes around the circle. I used hot glue to glue the bottom points onto the canvas and then glued the top corners of the candy canes to the one next to them.

I then added some white twine to some 1-inch buttons and hot glued them to the centers where the two candy canes meet.

Next, I assembled the Shadow Box kit as shown in their instructions, but used the second circle canvas as my background instead of a piece of paper. I centered the vellum sheet onto the center of the circle canvas and glued that to the top of the candy cane layer, which I previously did.  I then covered my foam wreath form with the red dot ribbon and hot glued that on top of my Shadow Box sticker layer.

I wanted to add a little bit more decoration to my wreath so I took a large kraft tag and layered it up with a striped flower, some mesh ribbon, a cute realistic looking cookie ornament, some greenery, a button tied with twine and the "Merry Christmas" banner which is from the Chit Chat die cuts. I had a sparkly red glitter bow in my stash that added to the left edge of the wreath. I glued the tag and all it's fun bits to the top of the glitter bow.

Finally I wrapped some burlap twine to two of the top candy cane bundles. I hot glued that really well and then made a loopy bow and hot glued that to the top of the twine I just wrapped. This serves as my hanger for the wreath.

I hope this wreath has inspired you to create your own fun and festive holiday decor piece! The "Gingerbread Kisses" collection was perfect for this candy-themed project, and I had so much fun making it. I encourage you to get creative and use your favorite holiday collection to put your own spin on this wreath. It's a great way to showcase your favorite holiday treats and add some cheer to your home this season. Happy crafting!


DOODLEBUG PRODUCTS USED

Gingerbread Kisses Shadow Box Insert Kit
Gingerbread Kisses Chit Chat Die Cuts

OTHER

Candy canes
2 Circle Canvases
Foam Wreath Form
Ribbon & Twine
Buttons
Hot Glue
Decorations for the tag

Thursday, November 2, 2023

ADVENT CALENDAR HOUSE GINGERBREAD KISSES SHADOWBOX VERSION | With Traci

Hi everyone! Traci here and for this week's project, designers were asked to decorate the brand new Gingerbread Kisses Advent Calendar. Oh my gosh, yes please!! How fun! This project is a great way to count down the days leading up to Christmas and it's perfect for saving all sorts of little goodies inside the drawers!

The house is approx. 15" x16" and it's made of heavy weight white chipboard. It has 24 drawers that measure 2.25" x 2.25" x 2.25" each.


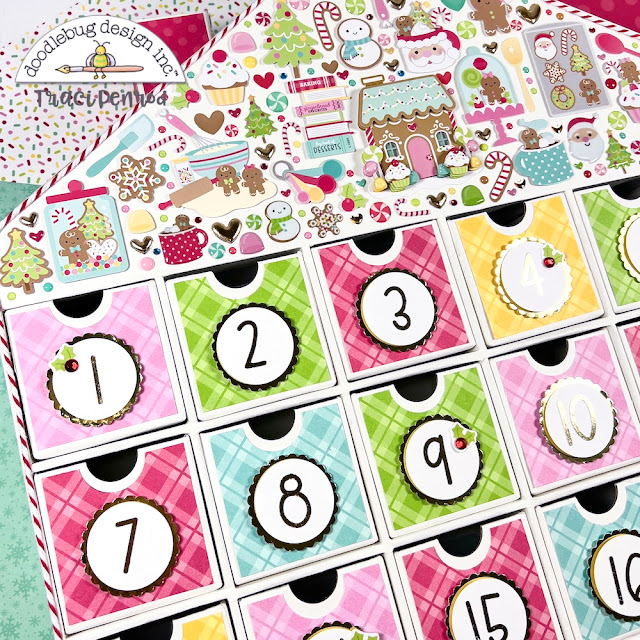
I started with the white triangular space on the front and filled it with lots of wonderful holiday stickers. I used the Gingerbread Kisses Shadowbox kit ... which I just adore! It has
the cutest cookies, houses, baking utensils, Santa Claus, Christmas trees, hot cocoa, and candy canes. Sometimes more is just more, so ... I mixed in some extra shape sprinkles, enamel dots, puffy stickers, and mini jewels!


In the center, I placed the Candy Cottage Doodle-pops. It adds dimension and I love the details of the candies, cupcakes, and enamel accents. I wanted to add a touch of gold, so I included some gold heart puffy shapes and gold enamel hearts from the Hello Love shape sprinkles. 

Next, I worked on the roof. I added the 12x12 Deck the Hall print, a small piece of white paper cut with a scallop punch, some gold enamel dots, and gold scallop washi tape. I covered the chimney in the Christmas Jammies print from the 6x6 paper pad, then trimmed that and front of the house with chunky twine in ladybug.

I covered each drawer in the Plaid & Polka Dot Petite Prints in cherry, limeade, pistachio, and bumblebee. Using a 1 1/2" scallop circle punch and a 1 1/4" circle punch, I cut shapes out of Bazzill's gold foil paper and white card stock. Then, I added gold Sunshine number stickers, a few holly leaves, and red mini gems.


And then, she was done!! I cannot wait to display this next month and count down the days with my grandchildren. They're going to love it. 

The Gingerbread Kisses Collection has so many great Christmas products! I hope you'll give this one a try. It was so much fun and this calendar is something you'll have for years to come.

 
DOODLEBUG PRODUCTS USED

Gingerbread Kisses Collection
Gingerbread Kisses Shadowbox Kit
Doodle Twine in Ladybug
Sunshine Alpha Stickers in Gold
 Hello Love Shape Sprinkles

Pin It button on image hover