Showing posts with label Shaker Tags. Show all posts

Monday, December 23, 2024

TINSEL TIME SHAKER GIFT TAGS | with Kathy

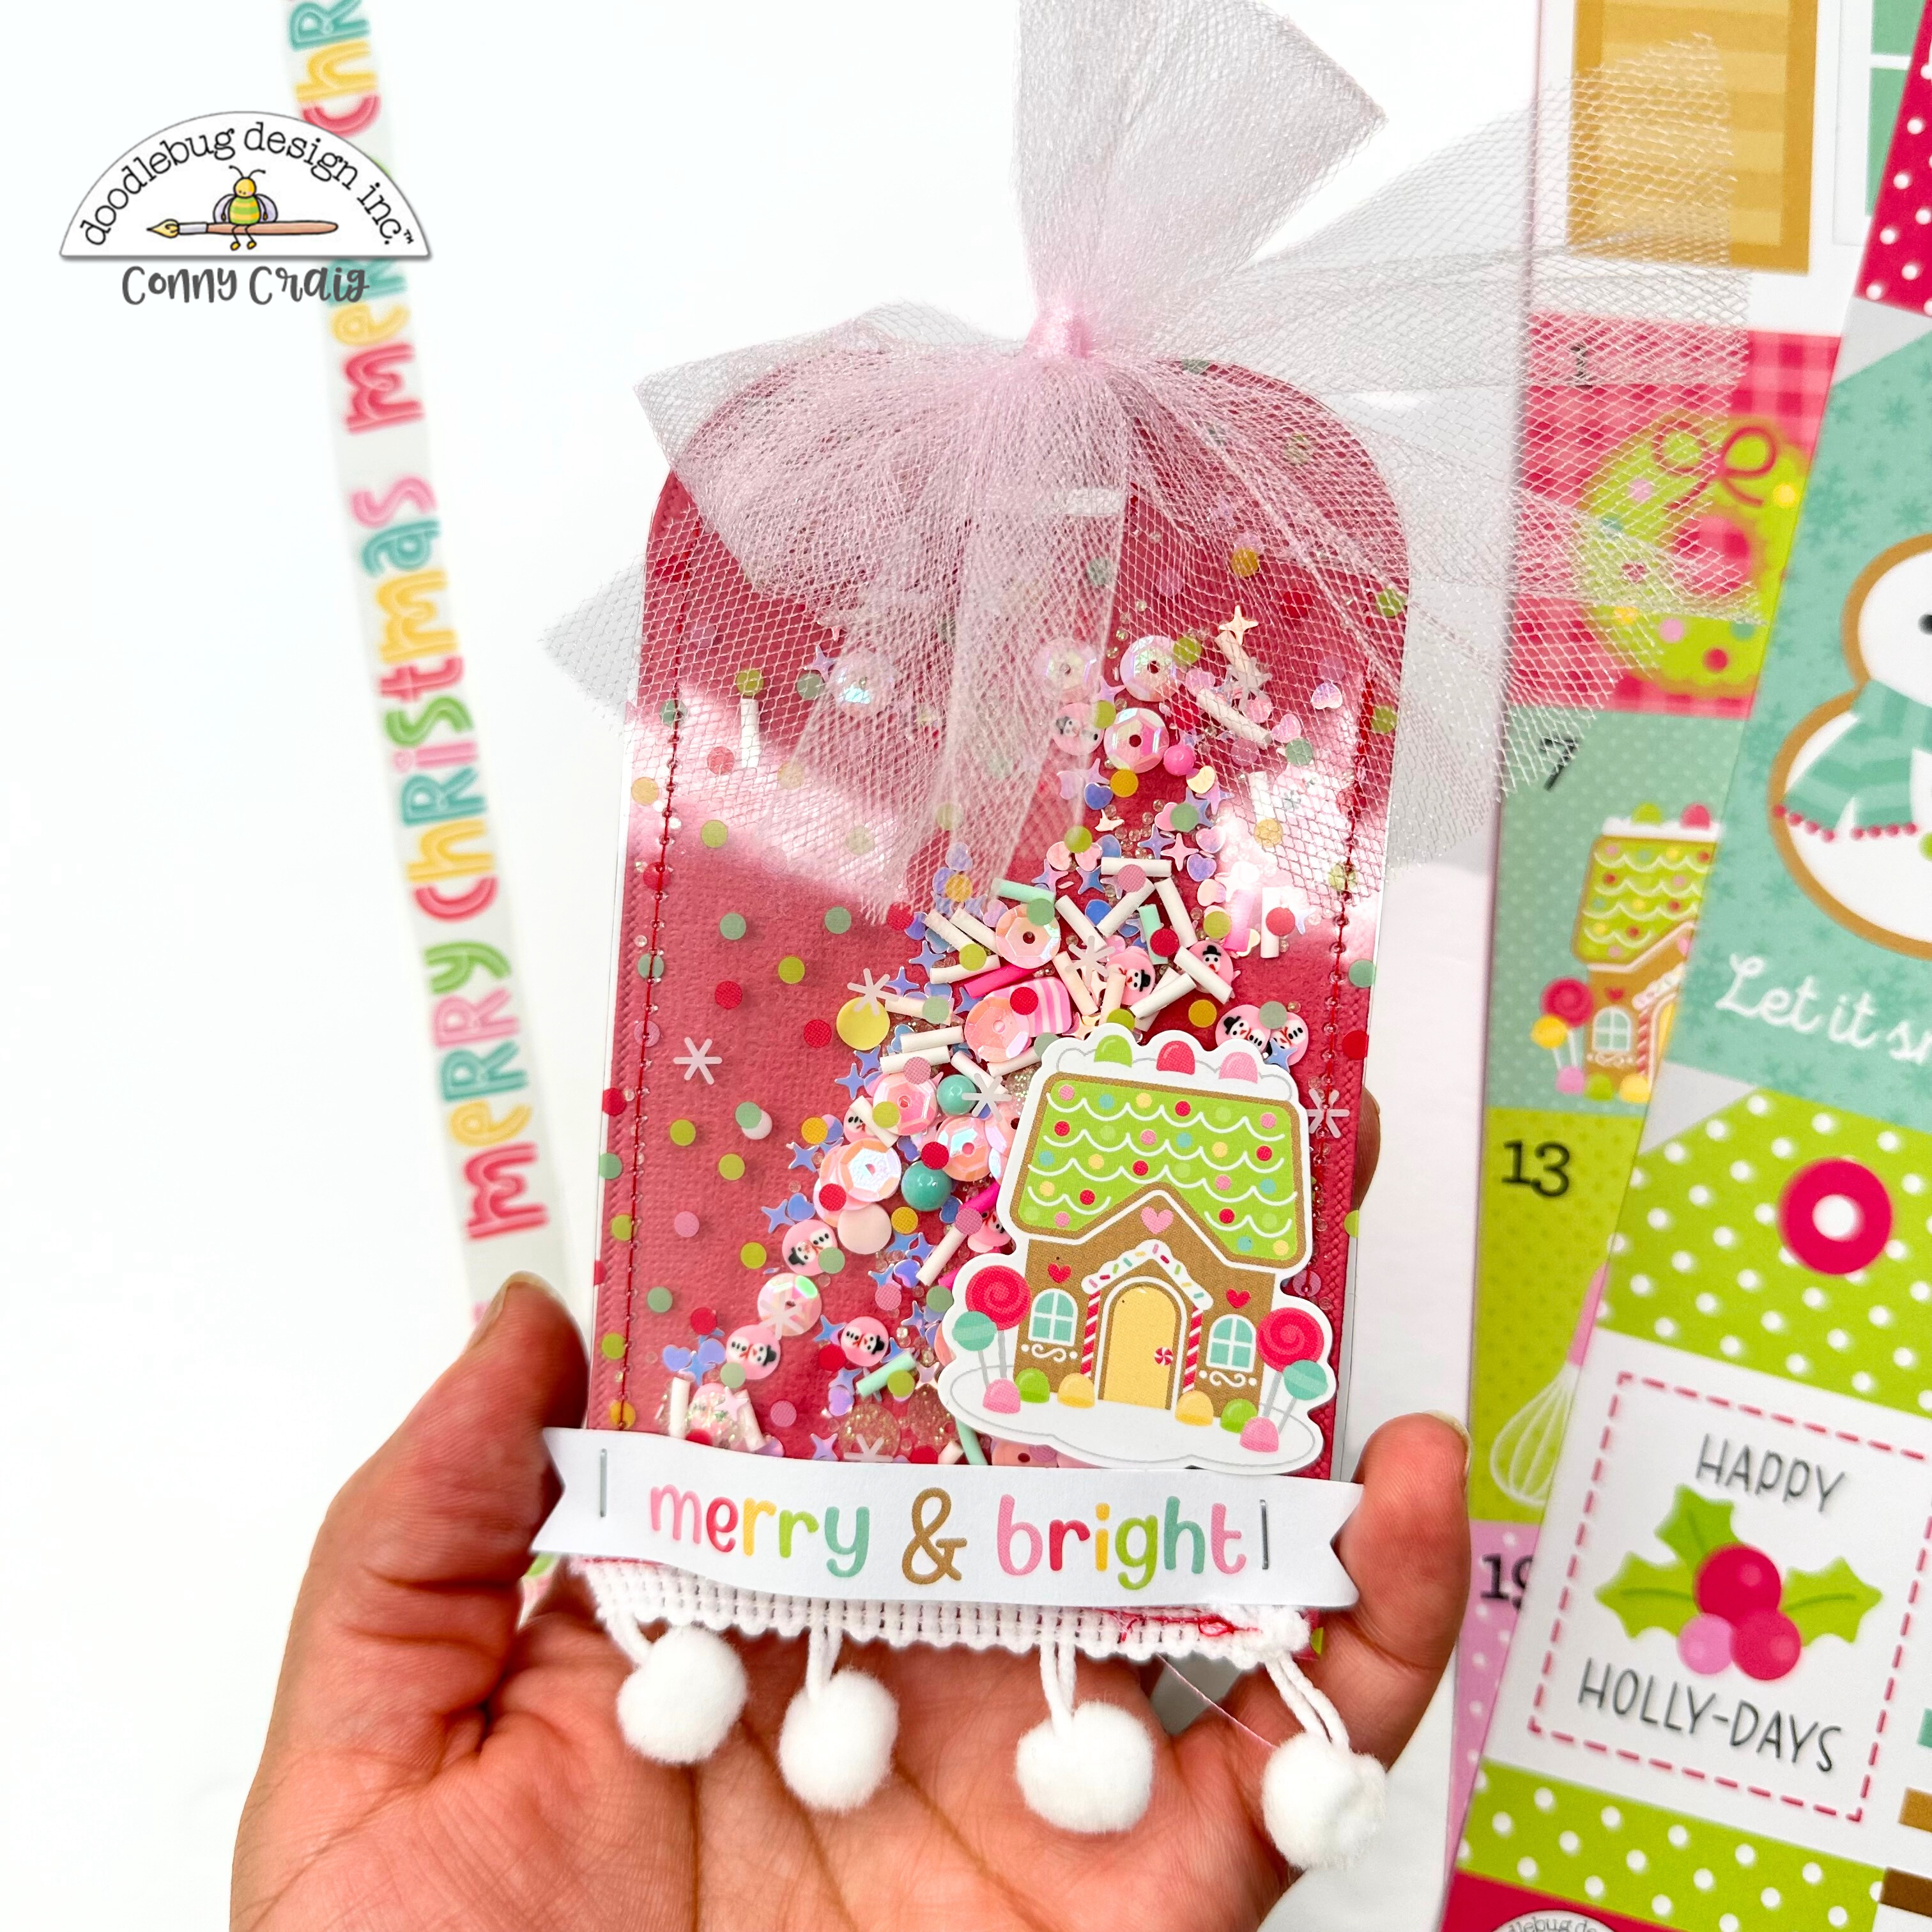
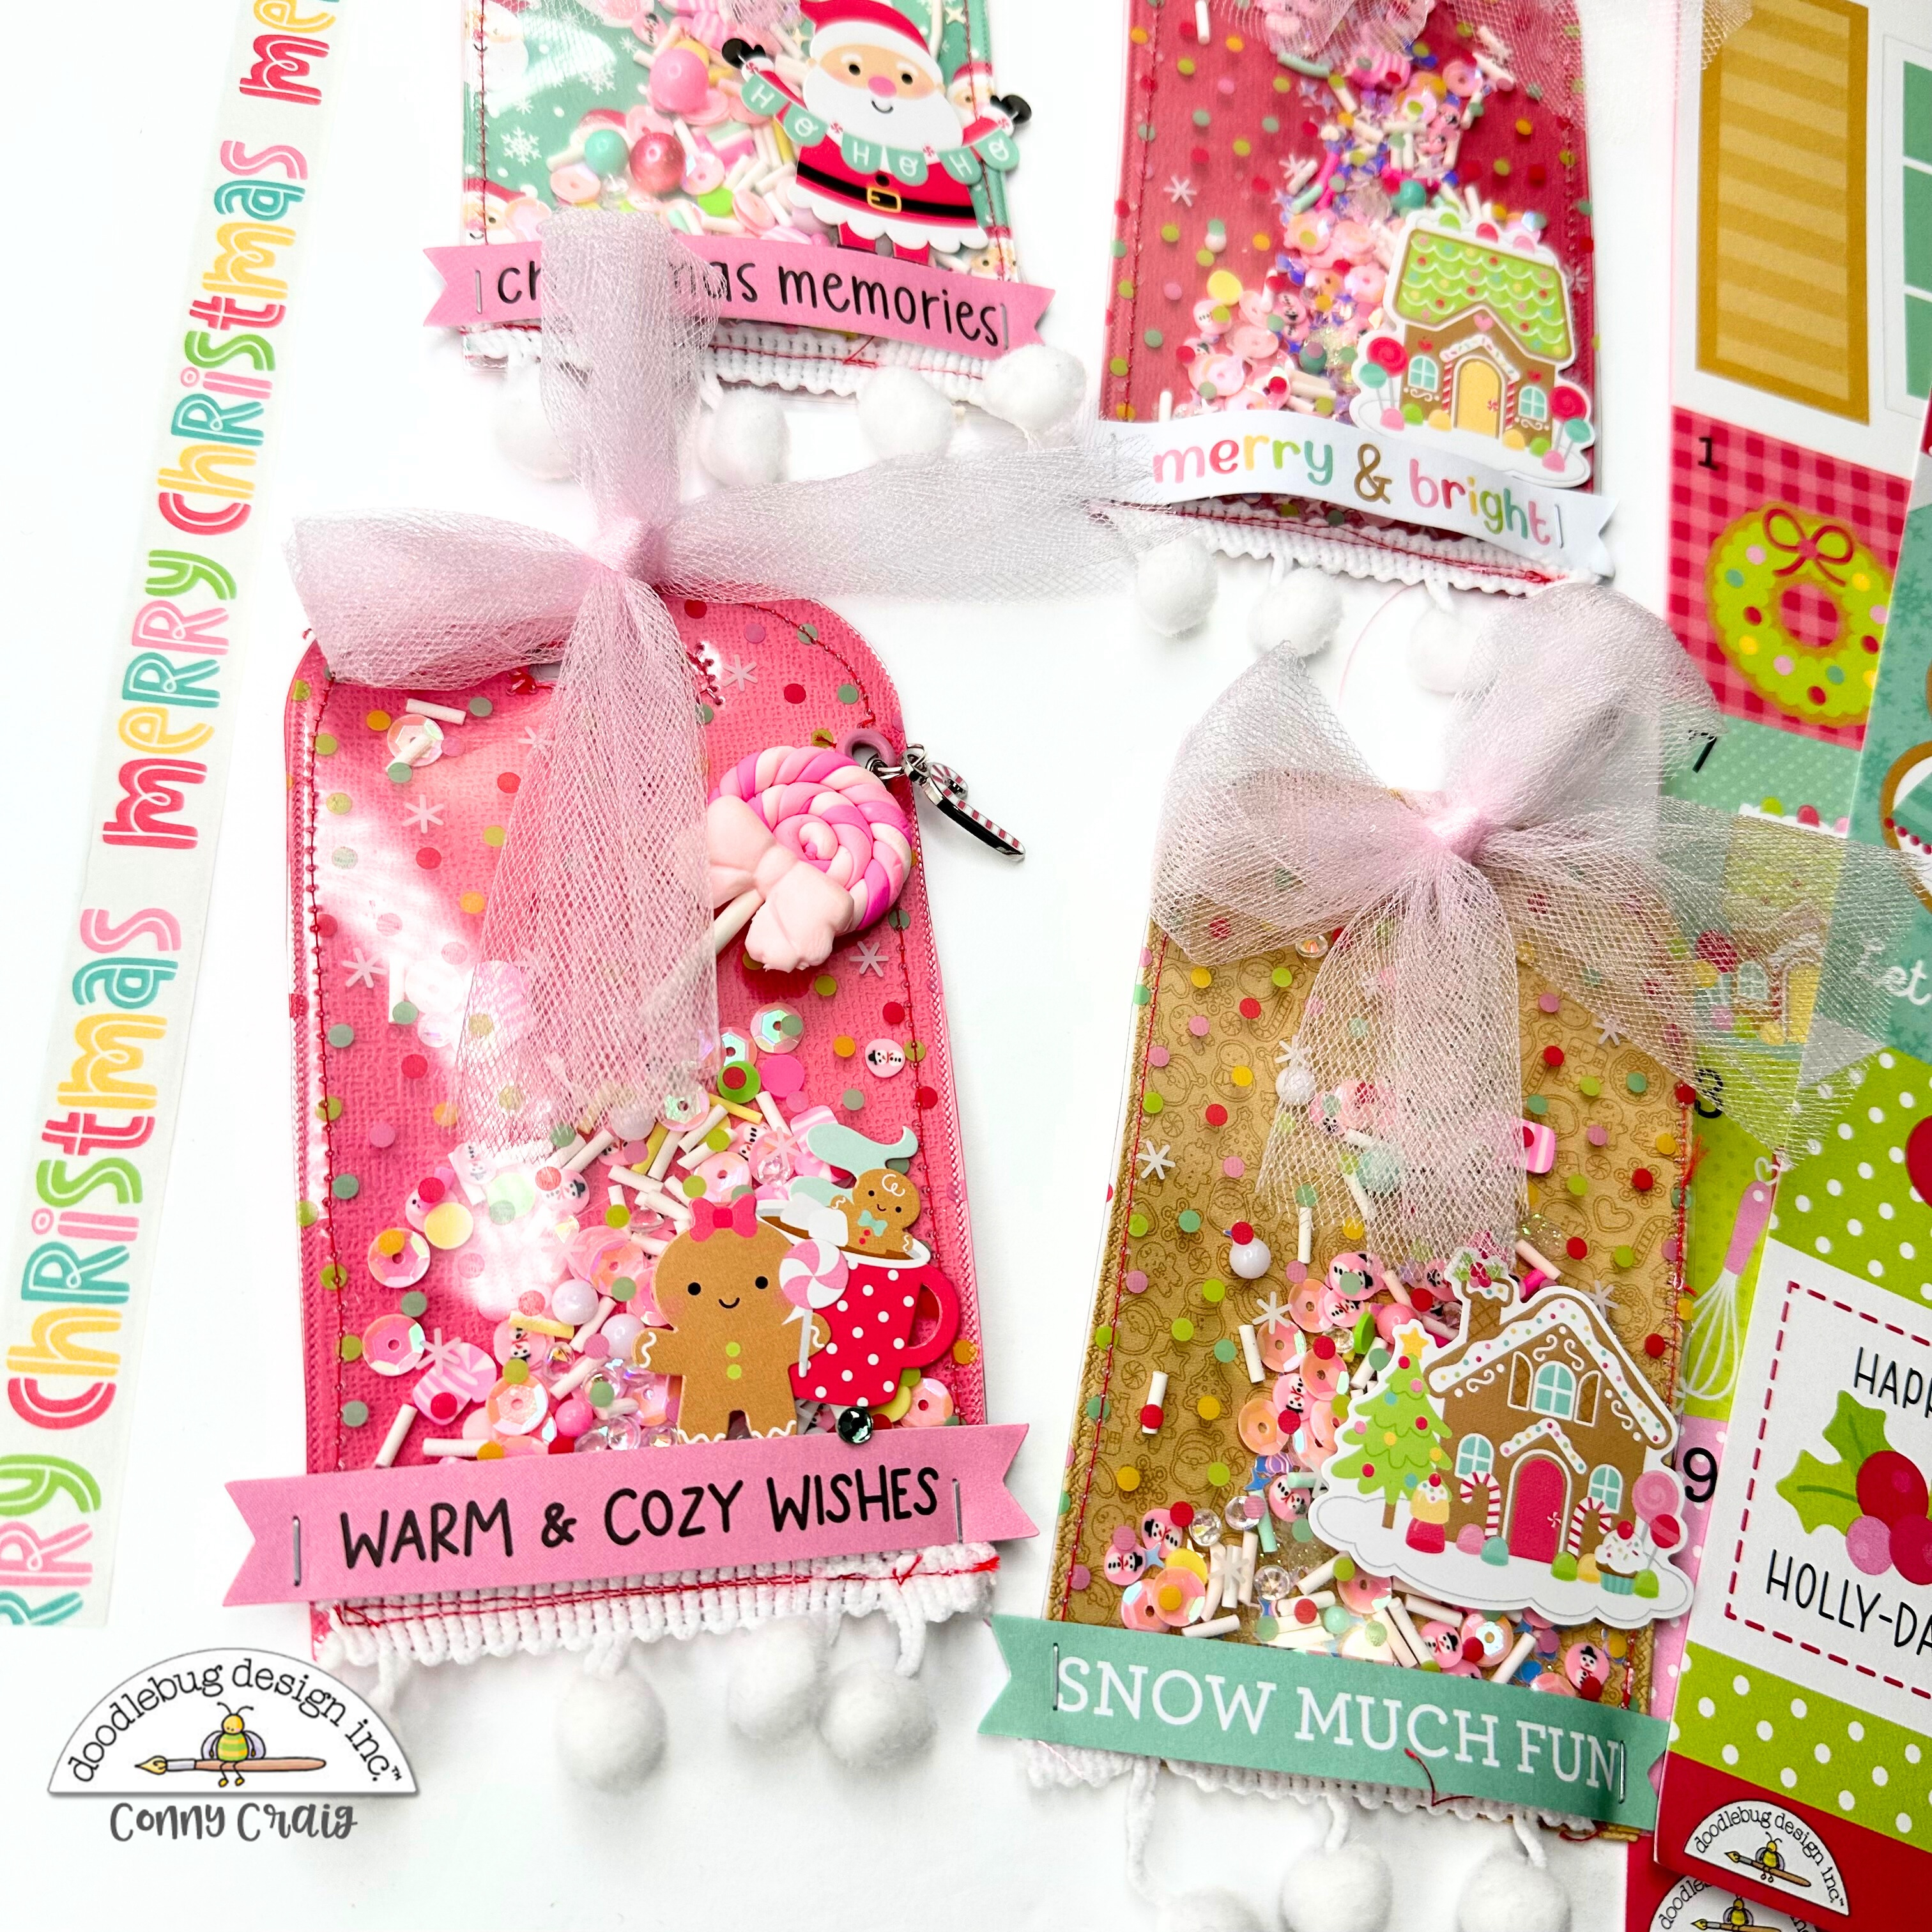
We are officially down to the wire!  It's time to get all of those Christmas gifts wrapped and put under the tree!  I decided to add some fun Tinsel Time Shaker Tags to some of my gifts this year... take a peek...


I started with some Tag Dies from my stash.  I cut them from some Tinsel Time Coordinating Textured Cardstock.  I lined the bottom tag piece (without the window)  with some fun papers from the 6x6 pad.  I love the smaller prints, they work perfectly for projects like this.  I covered the open window of the tags with some Heavyweight Acetate.  I added some double sided 1/8"foam tape to outline the window, filled it with some fun shakers then attached the top tag to the bottom!  All that was left was to decorate which was easy with all the fun Puffy Stickers, Shaped Sprinkles, mini Jewels, Icon Stickers, Odds & Ends and Bits & Pieces!  Here are some close-ups...


On the "B" side of the Happy Holly Days 6x6 paper are word strips that are great for cards & tags.  I used them for sentiments on my tags.  I also added some fun Glitter Sprinkles from the Christmas Assortment to some of the ornaments.


In addition to Doodlebug Shaker balls, I also used the Happy Holidays and Jolly Holly Shakers.  I also added some shaped sprinkles from the Christmas Candy Shaped Sprinkles.

To top my tags I stapled some grosgrain ribbon using my tiny attacher stapler.  They are all set to be added to my gifts!

Here's a little video of my tags.... it's always more fun to see things in motion!

I hope that everyone has a wonderful, safe & healthy Holiday season.  I'll be back in the new year with some more Doodlebug projects!  Thanks for stopping by to peek.


BLOG | INSTAGRAM | YOUTUBE

DOODLEBUG PRODUCTS USED

Tinsel Time Collection
Heavyweight Acetate
Shakers (Ladybug, Cupcake, Limeade, Silver, White, Mint & Bumblebee)
Happy Holidays Sprinkles
Jolly Holly Shakers
Ice Crystals Shakers

OTHER

Tag Builder Blueprints 5 Dienamics
Sizzix Big Shot
Grosgrain Ribbon
Tiny Attacher
1/8" foam tape
1/8" double sided tape
Foam Squares


Saturday, November 23, 2024

FARMHOUSE SHAKER TAG MINI ALBUM | with Conny

Hey Crafty Friends, it’s Conny! I’m excited to share my latest project featuring the charming Farmhouse collection. One of my main inspirations came from the beautiful 12 x 12 Double-Sided Buffalo Plaid paper. I particularly loved the side with tags, which was a perfect template for creating the additional tags throughout my mini album. The rustic and cozy feel of the plaid really brought my project to life, and I can’t wait for you to see how it all came together!


Here's how I put it together!  I began with a template measuring 5 7/8" x 3 1/2".  I cut all my papers from the 6x6 paper pad or used scraps left over from my last project. Additionally, I utilized some Heavy Clear Acetate to create the templates for my shaker tags.

For the next step, I used my sewing machine to seal three sides of the tag. Then, I added a mix of shaker elements, including Shades of Fall and Fall Flowers Shakers, as well as some Tangerine Shakers. For extra flair, I included round sequins in bumblebee and cupcake. After adding the sprinkles to the clear acetate, I sewed the top of the tag shut using my sewing machine.


For the shaker cover, I embellished it with flowers from the Bits & Pieces, along with some Puffy Icon Stickers and the Turkey Time Doodle-Pop. I also added the Mini Maple Little Charmer to the ribbons. Inside the mini album, I decorated further and included photo mats that measure 3 1/4" x 4 1/4". Additionally, I incorporated a few smaller tags from the Bits & Pieces and added pom-pom ribbons for extra detail.


I added shakers as covers and one in the middle of my mini-album. My mini-album has about seven pages, but you can definitely add more. Have you ever created a mini-tag album before? I would love to see you give this project a try! You can hand stitch and create different fun patterns if you don't have a sewing machine. Make it enjoyable and uniquely yours!


Thank you so much for stopping by! I love sharing with you all my creative ways of making projects. Xo Conny!


DOODLEBUG PRODUCTS USED

Farmhouse Collection
Clear Acetate
Fall Flowers Shakers
Shades of Fall Shakers
Shaker balls - Tangerine
sequins - Bumblebee & Cupcake
Doodle Twine
Mini Maple Little Charmer

OTHER

Ribbon
gold binder ring
Score/ Cutting Board
Sewing Machine

Saturday, September 14, 2024

HEY PUMPKIN SHAKER TAGS | with Conny

Hey everyone! It's Conny from TheDailyLifeofCreativity with Hey Pumpkin Collection, and I'm excited to share these gorgeous shaker tags with you. I adore creating shaker tags because they're incredibly enjoyable to make and I love how versatile they are – they can effortlessly enhance various projects. I will be adding these tags to my October/Halloween cards or mini albums.
Let's begin! I started by selecting some 12"X12" cardstock. If you prefer to use the 6"X6" paper pad, that would work great too. The smaller images on the paper can be fun to play with when creating shakers using acetate.
I chose the Homespun heavy acetate, as well as the "Boo-tiful Bouquet" paper. I used the floral side with the spiders and the side with the black polka dots. I also used the "Moonlight Magic" paper and "Plaid It's Halloween." For the shakers, I picked the "Peek-a-Boo" paper because I felt like they would stand out more with the acetate, letting the "Halloween Night" and "Sweet Treat" shakers pop.
I usually prefer my tags to be 3"X5". There are many dies available with stitching, and SVGs, or you can even make them yourself. Cutting them is simple. To bind the tags together and turn them into shakers, I used my sewing machine with white thread. I stitched all around, leaving a spot open at the top to add the shakers. After that, I closed the opening using my sewing machine.

I spruced them up with some chit-chat, odds & ends, bits & pieces, and mini icons. I then used a staple to attach the chit-chat pieces to the bottom of the tags and layered the embellishments on top. To finish them off, I added a black tulle bow. 
I'd love to see your take on these tags, so be sure to tag us. Wishing you a delightfully spooky time, my little pumpkins!


DOODLEBUG PRODUCTS USED

Hey Pumpkin Collection
Homespun Heavy Acetate
Halloween Night Shakers
Sweet Treats Shakers

OTHER

Foam Adhesive
Sewing Machine
Black Tulle

Thursday, April 4, 2024

DOODLEBUG SHAKERS RAINBOW GIFT SET | with Tya

Hi there crafty friends! It was so much fun getting to play with the brand-new D.I.Y Snow Globes this month! I don't know about you, but it has been a little dreary in my neck of the woods and I knew I wanted to brighten things up so I used the super bright and happy "Over the Rainbow" collection and a few Doodle Pops from the "Bunny Hop" collection to create this fun little gift ensemble which includes a snow globe, a cute shaker lid container, and a whimsical Tag Flip!

To make the Snow Globe, I used the 6x6 Rainbow Wishes paper with the cloud background and layered up some Odds and Ends, and the cute "Hello Sunshine" Doodle Pop to make a little sky scene. I added some of the "Gnome Sweet Gnome" 6x6 paper and traced the base of the Snow Globe onto it. I then added it to my Snow Globe base and decorated that section with a cloud, a button tied with some yellow twine, and some cute yellow pom-pom trim to finish it up.

I used the Cupcake, Bubblegum, Ladybug, Tangerine, Bumblebee, Limeade, and Swimming Pool Shaker Balls to fill up the Snow Globe. Aren't they so much fun?

Next, I created this cute little container with a shaker lid! Believe it or not, this is made from a small Pringles Can and a 3-inch plastic ornament half to make the shaker lid. I fell in love with this little technique and can see myself making oodles of these! They are the perfect way to showcase all of my favorite Doodle Pops! They are so fun to fill up too!

To cover my Pringles can, I used a 4 1/2 x 10-inch strip of Over the Rainbow Stripe paper. I then added two of the decorative border strips from the Lucky Me paper. I added the "It's a Rainbow Kind of Day" die cut to the front of the can with some foam tape. I also added some cute yellow pom-pom trim to the top of the border strip along the bottom of the can. Cute colors abound here!

To make the lid, I added some lightweight chipboard strips behind the clouds on the "Hello Sunshine" Doodle Pop. This made it fit well in the dome. I added a 3-inch cardstock circle on top of the plastic lid and then glued the Doodle Pop down with hot glue. I added the Shaker Balls to the dome and then centered the dome on top of the lid. The dome is held onto the top of the lid with hot glue. This is so fun to shake up!

On the inside of the container, I did a quick little tag flip and featured some of my favorite pieces of the "Over the Rainbow" collection. It fit perfectly, ribbons and all, inside the container!

As you can see, the first tag on the page is a shaker tag that was decorated with some pattern papers, and acetate. The shaker balls were a great interactive element for the cover tag on this little flip!

Here are the tags I did! Lots of layering of 6x6 papers, Odds and Ends, Chit Chat, and Puffy Stickers!

Getting to play with the Snow Globe and Shaker Balls was such a delight and I am thrilled with how this little set turned out. I plan on giving it to a cute niece of mine to brighten her day! Thank you so much for spending a little time here on the Doodlebug Blog today! I hope you have the best day and we will see you all next time! Happy Crafting Friends!


INSTAGRAM | YOUTUBE | BLOG


DOODLEBUG PRODUCTS USED

Over the Rainbow Collection
Bunny Hop Collection
Doodlebug DIY Snow globe
Shaker Balls
Bubblegum Textured Cardstock

OTHER

Pringles Can (2.5 ounces)
3-inch plastic Christmas Ornaments
Hot Glue
Yellow Pom-pom trim
Button
Yellow Twine
Tag Die
White Book Ring
Ribbons for Tag Flip

Saturday, December 16, 2023

GINGERBREAD KISSES SHAKER TAGS | with Conny

Happy Holidays!
 

Hey there! This is Conny from The Daily Life of Creativity and I wanted to share with you some really cute tags I made using the Gingerbread Kisses Collection. With the holiday just around the corner, it's the perfect time to add a special touch to your gifts or baked goods. These tags can really add that extra bit of personalization. I personally love making shaker tags!


To get started, you can create tags in any size or shape that you like, depending on how you plan to use them.  For this example, I used a 3 x 5 metal die, but you can use any shape you like, this one example would work great. You can add a shaker in the front and place a special note in the back pocket. It's a really fun and unique way to finish off a gift!


First, start by picking out the papers that you want to use for the shakers. I suggest using the Sugar Sprinkles heavy acetate for this purpose. You can also add cute sequins or create your paper sequins using a punch hole. This way, you can quickly match the collection and add some sparkle to your shakers.


If you want to add some extra cheer to your holiday gifts, I suggest using tulle, Sweet Santa Little Charmers, mini icons, and chit chat die cut pieces to decorate your tags. This collection is perfect for crafting unique and adorable tags that will put a smile on anyone's face. Let's get creative together and make some beautiful tags!


Thank you for reading, We can't wait to see what you create using the Gingerbread Kisses.


DOODLEBUG PRODUCTS USED

Gingerbread Kisses Collection
Sweet Santa - Little Charmers
Doodlebug Sequins
Sugar Sprinkles Heavy Acetate

OTHER

Tulle
Sewing Machine

Sunday, August 5, 2018

Shaker Tags | with Anabelle

Shaker projects have definitely taken the paper crafting industry by storm as we see more and more creations popping up with little shakers filled with the sweetest ephemera. And as I'm so in love with Doodlebug sequins I knew I wanted to make some shaker tags combined with the Cream & Sugar collection and a little touch of glitter too.


First, I found some pocket page protectors that I have in my stash. I used both 3 by 4 and 4 by 6 sizes. I cut them apart and stitched any open sides (leaving one side open). Then I slid in the papers. 
In the past, when I've made shaker cards, I've poured the sequins in right from the bottle. Sometimes they would stick together due to the static. This time I wanted to mix colors and add glitter and seed beads. So, I poured everything into a glass dish and mixed them together before pouring them into the pocket.
One thing that I found out was to leave the glitter out of the glass bowl. It stuck to the sides. So, I added it directly to the pocket and it mixed with the sequins much better.
Once I added the sequin mix, I stitched the final side closed. You can use a fuse tool if you have one.
Then, I decorated! I loved adding the extra stickers, die cuts, enamel dots and other embellishments.


The two cards above are 4 by 6. I added some twine to create a bow and stitched folded doilies on them to give them even more dimension.
These two cards are 3 by 4. I let the large sticker hang off the side. It gives it a fun look. Just rub it against the carpet to remove the stickiness.

Here's a look at all of the cards together. I love how fun and festive they look!
Definitely give shaker cards a try. They are really easy and fun to make.

Thanks so much for stopping by! Have a great day.


Pin It button on image hover