Showing posts with label Traveller's Notebook. Show all posts

Thursday, July 20, 2023

HELLO AGAIN MINI PLANNER | with Jen

In case you haven't noticed yet, I LOVE acetate. And when I saw that Doodlebug was coming out with gold foiled acetate I squealed and immediately started planning my first project with it.

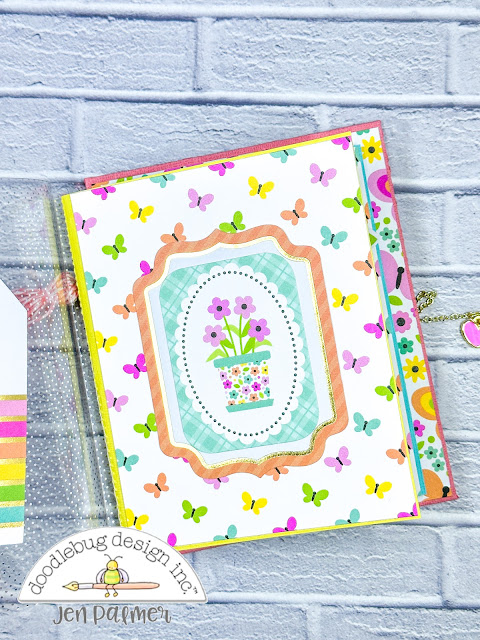
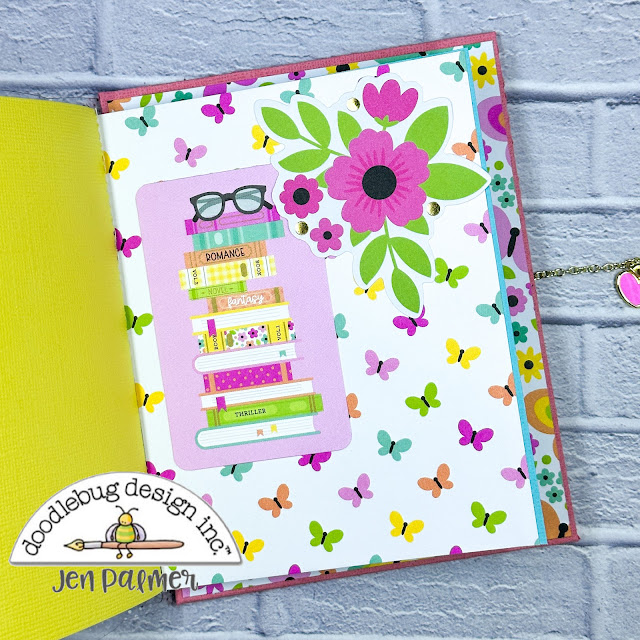
I've made a mini planner (or traveler's notebook, you decide!) using the new Hello Again collection and that amazing Gold Dots acetate. The planner measures 4 1/2" x 5 3/4" and is 3/4" thick. I made it small to easily tuck into my purse.

To hold my inserts I used the new Coral Doodlebug Twine and made a little tassel for the spine. For a closure I used some thin jewelry chain so I could add some of the new Little Charmers. They're so tiny and cute!

Inside I made two inserts that are 4 1/4" x 5 1/4". For the covers I used coordinating Doodlebug Textured cardstock and decorated them with some Bits and Pieces and two of the tag cut-aparts from the Just Because Plaid paper.


The full tutorial for this project can be found here.


DOODLEBUG PRODUCTS USED

Hello Again Collection
Gold Dot Heavy Acetate
Little Charmers
Coral Doodle Twine
Doodlebug Textured Cardstock

OTHER

Medium weight chipboard


Tuesday, March 8, 2022

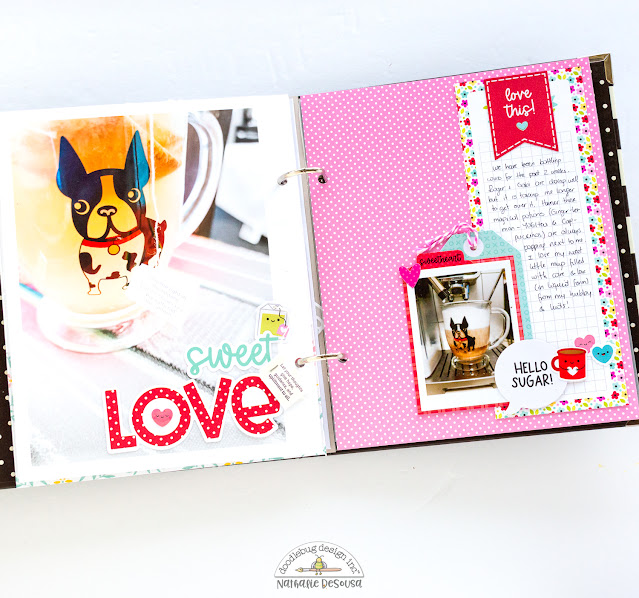
LOTS OF LOVE DAILY DOCUMENTING | with Nathalie

I am an avid daily documenter.  Small format documenting is probably my most favorite way to keep my daily memories.   I keep a few different small format  albums throughout the year.  Today, I want to share a bit of my personal album, and how I am using the Lots of Love collection.

My personal journal this year is in a 6x8 format, and I keep a combination of pocket pages, small layouts and large photos in it.

For my first  project, I combined a large photo with a small companion layout, and as you can see it documents a cute mug, tea and coffee!!  

The large Chit Chat pieces make perfect titles for the large photos.  Here, I added a few extra embellishments and one of the tea tags.


I opted for some Petite Prints for the background of my page. I added one of the large cut apart cards to the page, then layered elements behind the photo before attaching it to the page.    One of my favorite stickers is the little mug, so it was perfect to add it here!


I used the back of page to create a small layout using the mail theme of the Lots of Love collection.


I have tons of rolls of washi tape, but I honestly can say that the new stamp washi tape roll is probably one of my favorites... All the cute stickable stamp seals are to die for, and also perfect to layer!


I am so happy when I find the perfect pieces for my projects, and that mail box is just perfection!

I hope these have inspired you, and gave you a small glimpse of my personal documenting.  Remember to document all your moments, and if you use Doodlebug cuteness, even better!  xo


Instagram | Blog | YouTube 

DOODLEBUG PRODUCTS USED

Lots of Love Collection
Petite Prints - Bubblegum
My TYPE alpha stickers - Beetle Black
Doodle Twine  - Bubble Blue


Saturday, October 20, 2018

Pumpkin Party Planner Pages | with Jomelle

It's Halloween Party Time in my Daily Doodles Travel Planner. Halloween is just around the corner and I'm getting more and more excited. As I mentioned in my last blog, Halloween is my jam. I just love everything Halloween has to offer.

I'm just excited to share with you what I have created to add to my Halloween Set Up. I am still using the Buffalo Check Daily Doodles Travel Planner. I am also using the same Monthly Insert.

The Monthly insert comes with a couple of extra pages after each month. For October, I created a layout for memory keeping. I am planning to add my kids'  picture with their costumes when they go Trick or Treating on Halloween.
On the right side of the page, I used the black card from the pumpkin party assortment cards and envelopes. I layered it with another paper from the 6x6 paper pad. I will add the picture inside the card.
On the left side of the page, I will journal about Halloween Night.
Planner girls love to use washi tapes to create dashboards so I decided to use the Halloween washi tapes to create a bookmark/page marker.
Here are all the washi tapes I used.  I took another piece from the pumpkin party assortment cards and envelopes. I laid out the washi tapes diagonally on the blue card and I cut out the excess tapes. 
There you go, you have a cute little bookmark/page marker.
I created another bookmark/page marker that can also be used to store stickers, odds & ends or sprinkles.
I just cut up one of the 12x12 paper to the size I want. I added these 2 clear square self adhesive pockets that I got from the Dollar Spot at Target. Super easy to make.


I also want to show how easy it is to create a simple insert cover.
I just picked a 12x12 paper from the Pumpkin Party and I cut it to the size of my insert. Once you have the right size cut up, you can just fold it in the middle and there you have it.
You can place the insert and add it to your Daily Doodles. Super easy but still looks cute. You can create as many cover inserts as you want to add to your Daily Doodles.
For those of you who are not into "planning" the Daily Doodles Travel Planner can be used for memory keeping. Just think of it as the smaller version of your 12x12 layout. The best thing about the Daily Dooldes is that you can carry it with you when you travel.

I just want to share my memory keeping pages  I created when I went to Doodlebug Headquarter in August.

 I was able to meet Traci, one of the Design Team member and of course we had to take a picture with DB very own Cynthea. These girls are both super sweet.
I also asked all the girls who attended to sign my insert.
 Some of you may ask, I got the cute Halloween pen when I went to DB head quarter. It was part of the goodie bag we received. Super adorable huh?

Thank you for stopping by and I hope you all have a Franken-static Halloween!


Wednesday, August 8, 2018

Traveller's Notebook Spread | with Nathalie

Hello! I am here today with a new Traveler's Notebook spread documenting part of my trip to France last Summer. I have found that the Hello collection lends itself well to travel pages. Let me know what you think in the comments.
I included four photos which are 4x3 and 2.75x2 inches. I used two patterned papers, the green one on the right is from the 12x12 sheet "Lovely" and the blue striped one is from the 6x6 "Hello" paper pad. The pretty embellishments were selected from the Odds & Ends pack.
For the title, I used a combination of alpha stickers: the very top ones are from the Skinny sheet in Bon Bon and the bottom ones are from the Teensy alphas in the same color. I added a camera sticker (on foam dots) from the Icons sticker sheet and a strip of matching scallop washi to "shelve" my title block.
I finished with a few little flower stickers and a line of stitching across a heart die-cut to add a touch of brown on that side of the spread, and texture of course.
Whether your are documenting your Summer in a Travelers Notebook, in pockets or with layouts, I think you will enjoy the versatility and the fresh colors of the Hello collection!


Friday, March 16, 2018

Abigail Font Stickers | Traveller's Notebook by Nathalie

Just like the other designers did this week, I decided to use the Abigail stickers for my latest project. Their size, colors and style are perfect for covers and titles.

I am very excited because they totally inspired me to finish a traveler's notebook project I had been working on for a while. So today I am sharing my last spread, the opening page and the cover (I typically leave those two undone until the very end).
For the spread, I printed a full size photo and added the alpha stickers directly on it. I used four different colors of Abigail stickers to make it more fun. I love how they pop against the blue sky.
On the left side, I covered the page with some Cream & Sugar X's & O's paper and then made a pocket using some limeade cardstock from the Petite Prints pack. In the pocket, I put an office tag with my journaling. A piece of Doodlebug twine brings the blue of the sky on the left side.
The pocket is decorated with an arrow sticker from the Cream & Sugar This & That sticker sheet, tangerine Sprinkles and a Cute Clip.

For the opening page, I reserved a favorite photo that represented the blooming desert:
I placed it on a piece of yellow paper from the 6x6 So Punny paper pad and tore the bottom. I then created my title with the white Abigail stickers. The cute cactus clip (they are irresistible!) brings a touch a green. In the end, I decided to add more green with a bit of limeade swiss dot washi.

For the final touch, I used some coral Abigail stickers directly on the cover of my insert:
Isn't that a gorgeous color? I love how it turned out and I am so happy that this project is finally finished! Come back tomorrow for more inspiration with the Abigail alphas!

Nathalie

Wednesday, February 7, 2018

So Punny | Traveller's Notebook set up with Anabelle

Traveler's Notebooks are so versatile for daily planning. I love how you can make them suit your needs. There are so many inserts available these days. You can plan hourly, daily, monthly and weekly. You can plan everything from meals to budgets to what you will declutter. I have several planners and notebooks set up at once, all for different purposes. Today I'm sharing a love themed one that I set up for use around Valentine's Day. I could decorate with this theme all year long. The So Punny collection was perfect for it. I love the combination of traditional love themed elements along with the cute little matched up characters. This set up is in my Pocket sized planner. Here's the inside pocket and cover of the first notebook.
I adore the LOVE die cut so I knew that I wanted to use that as a focal piece. You can never have too many heart stickers, so I added them too. The felt heart clip from my stash was a perfect match, so I added an epoxy heart from the collection to it and attached it to the pocket.

Next, I used my favorite plaid paper from the collection to cover my insert. I added some washi as a spine cover and put the cute little gnomes on the cover. I love them!

This first insert booklet is the one that I go to on a daily basis. I carry it around with me and jot my to do lists on it.  Each day gets it's own page. There were so many cute elements that I could use. I cut up the boxes from the small paper pad and adhered them to the page. They make the perfect 'box stickers.' The washi and stickers were also good additions. I used the cute typewriter Doodle Pop to make a clip and added the small heart clips as a decorative element, too. 

On this page, I decided to go a bit bigger in my decor.  I added the die cuts to Valentine's Day because that's such a special day. I love how it works there!

The next insert in my TN is one that I made myself. I decided I wanted to make a little insert to hold some special love themed quotes. I'm a huge quote fan and love jotting them down to remember. Here is a tutorial on how I made it. 

First, I cut the patterned paper and some plain white paper to 6.5 by 5.25" I used 5 pieces of paper since I don't need this insert to be very thick. I rounded all of the corners.


Next, I just ran the papers through my sewing machine. I'm not a seamstress, so I have no idea what size the needle is. It's just the regular one that has always been on my machine. I did a basic straight stitch. If you don't sew, you could use a stapler.

I added the strip of washi to serve as a spine and give it a decorative touch.

Next, I decorated it. That's always the fun part. I love the mini doilies!

I love the candy theme of the paper so decorated the first page accordingly.


I plan on adding just a bit of decoration to the rest of the pages since they will be holding the quotes and my little notes. The washi is a perfect touch along with small stickers. And of course more doilies!
The So Punny line was perfect for my little Valentine's/Love themed Traveler's Notebook. I can't wait to start using it. Thanks for stopping by today!


Pin It button on image hover