Showing posts with label decor. Show all posts

Tuesday, November 7, 2023

ADVENT CALENDAR HOUSE - HELLO AGAIN STORAGE | with Nathalie

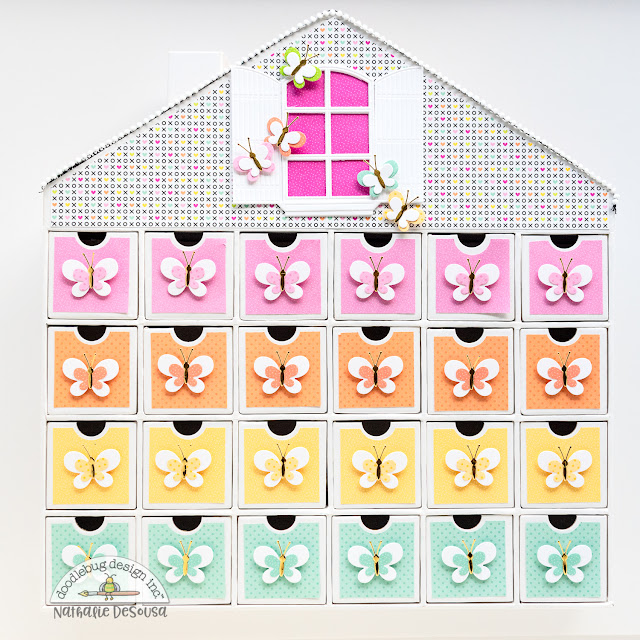
Today, I want to show you a little twist for your Advent Calendars. Maybe is the fact that we have adult children, and that we live in an apartment, that pushed me to look at this project as a storage case that can live in my common area throughout the year... Let me show you what I have created:

As you can see I went with a design that can easily fit in any room of my apartment where we need storage for little items (my daughter is already thinking about a second one for her earrings and make up)

I used the 6x6 Dot/Stripe Petite Print pad and the12x12 Dot/Stripe papers to cut the covers for each box. My inspiration for the colors was one of my favorite collections of this year, HELLO AGAIN. I also used the Butterfly Wishes Doodle cuts to create matching butterfly die cuts and attached them to the front of each box.


For the top of the calendar, I used patterned paper from the Hello Again collection to cover the top and the roof of the house. I used a die to create the window and shutters and added that to the top of the house. I added a bit of pom pom trim to the edge of the house to mark the roof of the house. Then continued the butterfly theme to the top of the window and shutters..

Once it was all ready, I filled the little boxes with my Doodle pins and a few favorite little trinkets. Like I said, it is the perfect place for some extra storage.

I hope this gives you a new idea for your Advent Calendars. Remember to share with us what you create!  XO

.

DOODLEBUG PRODUCTS USED

Advent Calendar House
Doodle Cuts Butterfly Wishes
Hello Again collection
Dots & Stripes Petite Prints
Dots & Stripes 6x6 paper pad
Smooth Cardstock

OTHER

Window Die
Pom-Pom Trim

Thursday, November 18, 2021

GREAT OUTDOORS 3D PICTURE | with Miguel

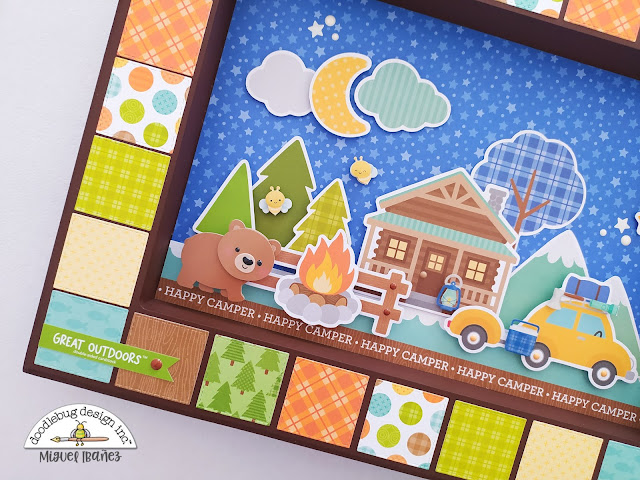
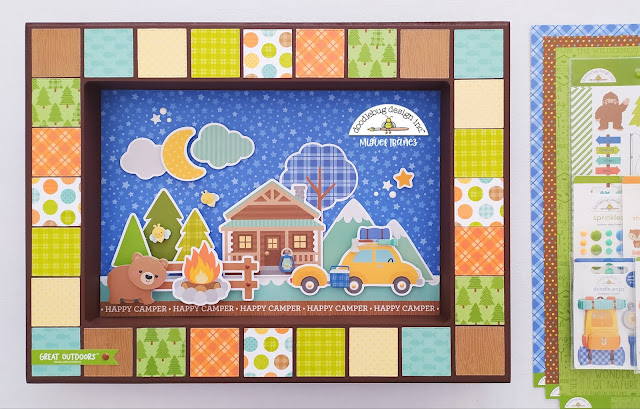
Altering pieces of wood is something that I love to do as it allows you to create and bring a simple piece to life. The beautiful "Great Outdoors" collection inspired me to make this decorative painting that I am sure would look great in a child's bedroom.

In particular I loved the range of colors used for this collection, in addition to all of the great designs! I  painted the frame with acrylic paint in a brown color, I then placed square cuts of all the paper designs around the frame.  I love all the designs!

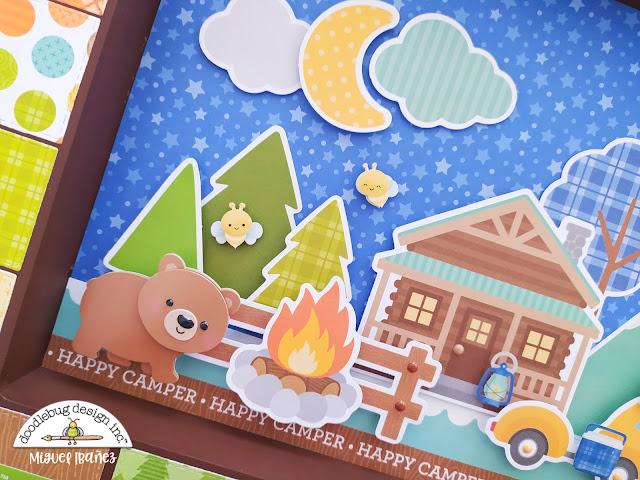
In the central part of the frame , I made a scene with the odds & ends starting with the cabin and surrounding it everything that alludes to a camp. Brilliant!

Doodle Pops and shape sprinkles are great allies when it comes to giving details to projects. I love how this beautiful Bear and the picnic items look like they go together perfectly!


Thank you once again for stopping by, I invite you to continue creating with the beautiful collections of Doodlebug. Bye Bye!

Facebook    Instagram


Doodlebug Products Used

Great Outdoors Collection
Shaped Sprinkles
Odds & Ends

Other

Wood Frame

Monday, October 30, 2017

Thankful Project: Banner and Favors by Wendy Sue

Well, hello there Doodlebug pals!  It's Wendy Sue here today, I know Halloween is tomorrow, but I'm getting a little jump start on the next holiday, which will be here before we even know it!  I love adding little festive touches to our Fall decor to turn it into "Thanksgiving" decor, so I'm switching up this simple frame with a little "Thankful" banner!  And, don't look now, but I'm making some little party favor type boxes to fill with delicious white chocolate popcorn!


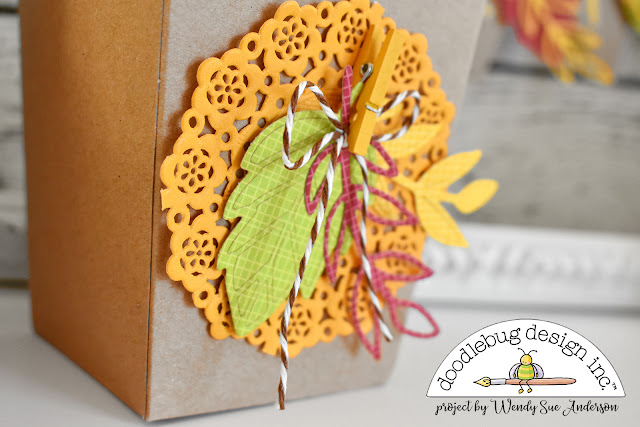
Since Doodlebug didn't come out with a new collection for Fall or Thanksgiving this year, I wanted to use some of my favorite fall colors from the basics collection.  I used a leaf die to cut each colorful leaf and beautiful gold "Abigail" letter stickers to create each flag on the banner. Each set of leaves is connected to the banner with a gold or brown mini clothespin.

Thanksgiving banner decor and party favors by @WendySue with products from Doodlebug Design!

I used some pre-made craft boxes for the treats, but, of course, I doodlebugified them!! 

Thanksgiving banner decor and party favors by @WendySue with products from Doodlebug Design!

I used the same leaf die-cuts, along with mini doilies, mini clothespins, and doodle twine. 

Thanksgiving banner decor and party favors by @WendySue with products from Doodlebug Design!

Then I filled each one with yummy white chocolate covered popcorn! 

Thanksgiving banner decor and party favors by @WendySue with products from Doodlebug Design!

Wouldn't it be cute to add a name to each clip and use these as placecards for Thanksgiving?!?

Thanksgiving banner decor and party favors by @WendySue with products from Doodlebug Design!

To sum up, I'm super thankful for all things Doodlebug!  I'm always inspired when I pull out Doodlebug products to create!  Hopefully you're finding time to be grateful and celebrate it over the coming weeks!


Wednesday, July 19, 2017

Odds & Ends Challnge: Pinwheels by Anita Bownds

Hi there Doodlebug peeps 
Anita here sharing a bit of fun Decor with the odds and ends
I love to make stuff just for fun and to decorate my craft studio and theirs nothing like a bit of colour to brighten up the room then these cute little die cuts and handmade pinwheels....


I pulled out all the odds and ends they're so cute don't you think!!


They are fun and so simple to make 
Here is my process video to show you how I made them 


The big outside pinwheel is 6 inch and the little one in the middle is 3 inch
And the small pinwheel is 3 inch and middle is 2 inch
And on the edges I use some border punches to the edges 


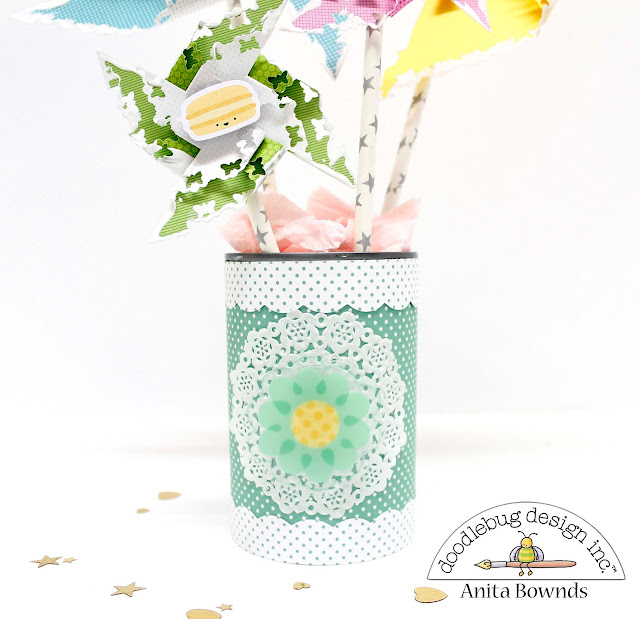
And decorating the tin can was super easy 
I just covered the can with a strip of patterned paper and then cut 2 strips 
and using my paper edges scissors I add a scalloped edge then add a doily in the middle and popped a clear die cut from the odds and ends pack.


I hope you have enjoyed my inspiration today 

Supply list 
4605 lily white paper doilies 
5065 pistachio Swiss dot 
5449 swiss dot rainbow petite prints paper pad
5448 dot grid daisy stripe rainbow petite prints pad
5484 cream and sugar odd and ends 
5485 spring things odds and ends 
065 mini pastel brad assortment 


Thursday, June 29, 2017

Yankee Doodle Collection: 4th of July Wreath by Brigit Mann

Hello, Doodlebug Fans! Brigit here to share with you a Fourth of July project created with the new Yankee Doodle collection. It's a fabulous red, white & blue patriotic themed collection with some shimmers of silver throughout.


To create this wreath, I cut out a bunch of pinwheels from the 12 x 12 paper pack and some textured cardstock using dies from My Creative Time. I hot glued each pinwheel onto a grapevine wreath and added some die cuts from the odds and ends pack.


Some of the die cuts were added by coiling wire around a pencil and hot gluing them to it, love how that looks.


The pinwheels are held together with some lily white, ladybug and blue jean mini brads.


This was definitely a fun and easy project to create, would make a lovely gift.

Well, I hope you've enjoyed this project, thanks for stopping by and have a wonderful day!

Thursday, December 6, 2012

12 Days of Christmas - Day 3 with Monique

Hi Doodlebug fans, it's Monique here with some projects to share for Doodlebug's 12 Days of Christmas!! As I couldn't decide on a project (layout, card or something else) I decided I'd make several!

Let's start with 2 layouts: 

My first layout "Jip" is my favorite, it's about my sweet Cocker Spaniel: Jippie:


The photo was taken on December 25th 2011 (my son decided Jippie should join us in the celebrations as well and so he gave her a Santa hat). To emphasize the date I used my Silhouette to cut the numbers background and the big "25". The round scalloped background was also cut with the Silhouette. The other fun details like the snowman, the sign post and the deer are all Doodlebug stickers.


Doodlebug North Pole supplies: 12x12 Patterned Paper, 6x6 Paper Pad, Cardstock Stickers (Icons and Party Banner), Doodle Twine, Cute Cuts, Mini Doodle-Pops, Doodles Cardstock Stickers (Merry Christmas).

Then my second layout "Faster", a totally different style as I wanted to try something else entirely.


When I made this page I decided to use the strip with the Doodlebug logo as well. I think it adds a funny little detail to the layout. 

Doodlebug North Pole supplies: 12x12 Patterned Paper, 6x6 Paper Pad, Cardstock Stickers (Icons), Cute Cuts, Mini Doodle-Pops, Teensy Type Alphabet Stickers.

My next project is a Christmas card: 


Don't you just love this collection? Look just how sweet this little birdie is!! 
The snowflake was cut with the Silhouette. 

Doodlebug North Pole supplies: 12x12 Patterned Paper, 6x6 Paper Pad, Cute Cuts. 

And then last but not least, a teeny tiny tutorial for a Christmas ornament. I figured if you're not ready decorating by now you wouldn't want a lengthy tutorial, but rather a quick fun one and maybe even one to do with your kids .... maybe something like this?


Well, take your 6x6 paper pad and your scissors and let's get started! 

1. Choose one sheet of 6x6 paper


2. and fold in half: 


3. Take your scissors and cut about 9 lines (while you paper is still folded), starting at the fold and stopping half an inch before the edge (the spaces between the cut lines are about half an inch as well), like this:

4. Open the folded paper and now fold it the other way: 


5. Adhere the sides with double sided tape or staple and push gently on the top so it will get a bit wider and you get a form like this:


6. To create the second, more playful, form, you fold you paper double as well, but now you adhere the two diagonal corners of your paper with i.e. a stapler: 


7. Add a piece of Doodle Twine in one of the corners and you're done!


Hope you like it!! 

Doodlebug North Pole supplies: 6x6 Paper Pad, Doodle Twine. 

These were my projects for today! Thank you for visiting Doodlebug's blog and I hope to see you back soon!!

Hugs,
Monique
Pin It button on image hover