Showing posts with label mixed media. Show all posts

Sunday, September 29, 2024

HEY PUMPKIN HALLOWEEN WHIMSY CARDS | with Guest Designer Jenn Shurkus

Hey Everyone I’m back! Jenn Shurkus here from Creative Chick Co.  and a self-proclaimed Doodlebug Addict. I love everything they release and was so excited to be invited to guest design. I have another two cards to share with you where I had a lot of fun mixing a bunch of products from the new Hey Pumpkin release! 

I started by stamping out the cat in a pumpkin tote image and the ghost from the Hey Pumpkin Doodle Stamps and coloring them in with Copic markers which are alcohol-based markers (sharing below the specific markers I used). I die-cut it out with the coordinating Doodle Cuts.

For the first card, I started by water coloring a purple background using Distress Watercolor Pencils, and Distress Watercolor Cardstock. I dried this background, and then trimmed this it down to 4” x 5.25”.  I matted it onto a piece of patterned paper from the Hey Pumpkin 6x6 paper pad. 

For the sentiments, I chose a few speech bubble die-cuts from the Hey Pumpkin Chit Chat Ephemera Pack. I also white embossed “Happy” from the Hey Pumpkin stamp set onto black cardstock. Whenever I do ANY embossing, I prep the surface using the Cottontail Embossing Powder Tool. I also like to use a white pigment ink when I am embossing with white embossing powder. 

Next, I die-cut the “Halloween” word included in the Hey Pumpkin coordinating Doodle Cuts several times out of black cardstock, and once out of black sparkle cardstock. I adhered them stacked together with wet glue. 

I added some Prisma Glitter to the highlights of the pumpkin with a Sakura Quickie Glue Pen. I also added some Sakura Black Glaze Pen to the eyes of the cat, and the eyes and mouth to the pumpkin. 

I added the sentiments, pumpkin and speech bubbles to the card with black foam squares. I then sprinkled a few stars I cut out with the Hey Pumpkin Doodle Cuts out of black sparkle cardstock. Lastly, I added a puffy bat from the Puffy Icons Sticker sheet.


For the second card I trimmed down the Homespun 12x12 Acetate sheet to 4.25” x 5.5”. I also die-cut a stitched frame out of black sparkle cardstock. I used wet adhesive to adhere the frame to the front of the acetate panel. 

I then ink blended a background onto a piece of Distress White Heavystock with the following Distress Inks: Mustard Seed, Festive Berries, Wilted Violet. Next, I splattered some stars” with Gansai Tambi Starry Colors palette. 

I flipped the framed acetate panel over, and added 2 layers of foam strips around all four sides. I then sprinkled some Hey Pumpkin Halloween Night Shakers into the space. I also added some iridescent sequins. I then peeled the backer paper off the foam strips and adhered the ink blended background to them creating a shaker front. 


I added some Prisma Glitter to the highlights on the ghost, and “BOO” banner with a Sakura Quickie Glue Pen. I added some Sakura Black Glaze Pen to the heart and star in the speech bubbles. 

I chose a sentiment banner and some speech bubbles out of the Hey Pumpkin Chit Chat Ephemera Pack. 

I added the sentiment banner to the card front with wet glue. I added the ghost and speech bubbles with black foam squares. 

I sprinkled some candy stickers from the Puffy Icons Sticker sheet, and some stars from the October Sky Shape Sprinkles. Lastly I added some glossy accents to the glasses on the ghost. 

I am sharing the swatches of the Copic colors I used to color the images above so you can easily recreate them with the coloring medium you choose.  If you would like to learn more about coloring with Copic markers or alcohol-based markers, be sure to check out my Copic 101 online class, which includes a workbook! 

If these cards have inspired you to create with your Doodlebug Halloween stash I would love to see what you create! Be sure to tag me on social media!


DOODLEBUG PRODUCTS USED

Hey Pumpkin Collection
Hey Pumpkin Doodle Stamps & Doodle Cuts
Homespun 12x12 Acetate sheet

 OTHER

Copic Markers
Black Ink Pad (alcohol marker friendly)
Distress White Heavystock
Distress Watercolor Cardstock
Distress Inks ( mustard seed, festive berries, wilted violet)
Distress Watercolor Pencils
Gansai Tambi Starry Colors Palette
Glossy Accents
Black Sparkle Cardstock
Black Cardstock
Stitched Rectangle Frame dies
Prisma Glitter
Sakura Quickie Glue Pen
Sakura Black Glaze Pen
Black foam squares
Blender Brushes
Trimmer
Dot Runner
Glue Tube
Misti
Small Acrylic Block
Paint brush

Monday, February 12, 2024

LOTS OF LOVE - LOVE YOU LAYOUT | with Brianna

Hey friends! Brianna Lepper back with you today and we are celebrating love all month long! I used the Lots of Love collection to create this fun layout that documented a photo of my son and I. Last week, I checked him out of school early and we went to lunch and did a bit of shopping. We really enjoyed spending some quality time together.

To start, I went through all of the 12x12 patterned papers and pulled out the Lots Of Love, Hugs & Kisses, Happy Mail and Cloud Nine papers. I wanted to find a different way to highlight these pretty papers so I cut them each down to 8x8. I then trimmed a 7x7 piece out from each one so that I was left with four square frames. I layered and arranged them in a fun way and popped them up on foam tape. Before I adhered them down, I took a few Shimmerz sprays and splattered shades of pinks and blues to match the collection.

These patterns are so pretty together! By popping them up on foam tape, you are able to not only have dimension on your page, but you have the opportunity to tuck and layer embellishments into each frame.

Next, I matted my photo using the 6x6 paper pad and for my title, I chose two different phrases from the Chit Chat pack and layered them together. I love the contrast of the red and pink. The 'Love' piece really pops on top of my photo and the font is adorable!

Next, I pulled out a few pieces from the Odds & Ends pack to create my embellishment clusters. The elephant and bear pieces were too cute to not include on my page. I then grabbed some floral bits from the Bits & Pieces pack and tucked them in as well. They add the perfect amount of color to each cluster. And the heart balloons? So cute!

I wanted to include some smaller elements, so I also adhered a few of the Bright Bouquet and Love You More Sprinkles.

For some finishing touches, I sprinkled in the Love You More Sprinkles and added some tangled thread into my clusters.

Here's one last look at my layout. I really love how the large frames turned out! They created a perfect place for my photo and embellishments to sit.

Thank you so much for stopping by today, I hope that I've inspired you in some way! Are you looking for a fun, different way to highlight lots of patterned paper on your projects? You should try making these frames, it's super simple and you can do them in any size. See you next time friends! xo


BLOG INSTAGRAM | YOUTUBE


DOODLEBUG PRODUCTS USED

Lots of Love Collection


OTHER

White Cardstock
Shimmerz Paints Sprays

Monday, January 29, 2024

SNOW MUCH FUN SNOW COLD LAYOUT | with Brianna

Hey friends! Brianna Lepper here with you today and I'm kicking off this week with another layout using the gorgeous Snow Much Fun collection. Here's my page:


I love creating a snowy effect using white paint, so I thought it would be fun to use the Beetle Black Cardstock from the Snow Much Fun Solid Assortment 12x12 Pack as the base for my layout. I love the effect of the bright white paint against the dark background. It really makes everything pop off of the page. I sprayed my white acrylic paint a few times and then even added in some Distress Oxide Ink Spray in Speckled Egg. I then trimmed down the black cardstock and matted it with the Snow Much Fun 12x12 patterned paper.


Next, I went through the Bits & Pieces pack and pulled out all of the circle elements. I had this idea of arranging them on my background and using each one for my photo, title and embellishments. I popped them all up on foam tape and adhered them to my page.


Once I got my photos adhered down to two of the circles, I created my title using two of the Chit Chat Pieces. It perfectly on the larger view finder ephemera piece. I love how it looks!


I wanted to fill in some of the empty spaces between my circles so I went through the Chit Chat pack and pulled out a few more circle pieces and added those in. I also pulled out a few snowflakes from the Bits & Pieces pack to not only match my photos, but to also fill in the spaces. They really brought everything together!


This Snow Much Love Shaker-Pop was the perfect embellishment for this page. I love his belly full of glitter!!


Next, I adhered a few snowman stickers from the Mini Icons set and added in some of the puffy snowflakes from the Puffy Icons stickers. I'm really loving all of these pretty colors on top of my black background.


For a finishing touch, I put a few of the Sprinkles around the page and added in some tangled thread in coordinating colors. Here's one last look:


Thank you so much for stopping by today, I hope that I've inspired you in some way! I'll see you in my next post friends!


DOODLEBUG PRODUCTS USED

Snow Much Fun Collection
Snow Much Fun Solid Assortment Cardstock

OTHER

White Acrylic Paint Spray
Distress Oxide Ink Spray - Speckled Egg
Nuvo Mica Mist - Silver Smoke
Sewing Thread

Monday, January 15, 2024

SNOW MUCH FUN HELLO WINTER LAYOUT | with Brianna

Hey friends! Brianna Lepper here today and I don't know about you, but it's freezing where we are! It's probably not as cold as our friends up in the North, but it's definitely cold for us. When we lived in Louisiana, it snowed once every few years and every time we got to experience it, we LOVED it! I used the new Snow Much Fun collection to document this photo of our pups in the snow and had a blast creating this page. The color palette is gorgeous and so are all of the adorable icons. Here is my layout:


To start, I went through the 12x12 papers in the collection and was immediately inspired by the Wintery Woods paper. It has all of the gorgeous collection colors and I knew right away that I wanted to use it and embellish tone on tone. I went through my Shimmerz sprays and pulled out the sprays that matched the tree colors and sprayed them all on a piece of white cardstock. Once it was completely dry, I took my snowflake punch and punched out a bunch of snowflakes.


Next, I tore into the Wintery Woods paper, distressed edges and adhered it to a piece of white cardstock. I then arranged all of my snowflakes and had them cascade down the page and popped each one up on foam tape. They turned out so cute and added so much interest and dimension to my layout.


I then went through the Odds & Ends pack and pulled out pieces for each color section. I even pulled in a few of the 12x12 Cardstock Stickers, some of the Snow Colorful Shape Sprinkles and the Puffy Stickers. The purple section is my favorite!


For my title, I used one of the Chit Chat phrases and centered it right above my photo. It fit perfectly!


I wanted some extra sparkle so I sprinkled in a few of the Mini Jewels. They were perfect little additions.


Here's one last look at this super cute winter layout:


Thank you so much for stopping by today, I hope that I've inspired you in some way! Have you had a chance to grab this collection yet? It's so fun to work with and it's just so beautiful! See you in my next post friends!


DOODLEBUG PRODUCTS USED

Snow Much Fun Collection


OTHER

White Cardstock
Snowflake Paper Punch
Shimmerz Paints Sprays

Thursday, January 11, 2024

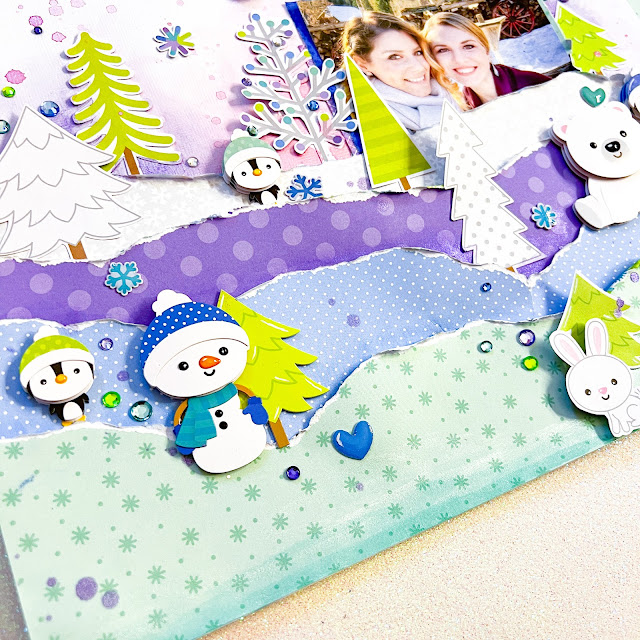
SNOW MUCH FUN WINTER CHILLIN' LAYOUT | with Lisa

Happy new year everyone!!! I'm wasting no time and diving right into winter layouts... Today I'm sharing a layout I created with the amazing Snow Much Fun collection.


I have to be honest... I had to go back a few years to find a photo that suited this collection and layout. There hasn't been a lot of snow this year and the day there was snow, I forgot to take pictures... :) So on this photo, you can see me with a friend as we spent time at Schwarzwald in Germany where we went to for a wedding.


To start, I ripped off irregular strips of 4 different patterned papers from the collection. I love the colors in this collection and the four colors look so good together. I stacked them one on top of the other and distressed the ripped edges a bit, to give the scene more texture.

Next, I went through the embellishments and chose a few favorites. It's always so much fun going through everything in the Doodlebug collections, you have soooo many things to choose from... sometimes I even have a hard time deciding... haha!


I chose a few Doodle Pops and adhered them to my scene.  I also added the little hearts and snowflakes that were part of the Doodle Pops packages.  I matted my photo with 4 random rectangles of patterned paper and added it to the layout. 

I went through the Odds & Ends pack and chose snowflakes, clouds, trees and a little bunny. I cut off a bit of the white borders and added them to the layout.


Then I went in with some metallic water colors and added some teal, pink and purple around the photo and clouds. I love the dimension it gives the layout. I also sprinkled pink and purple watercolor all over the layout.

For my title, I chose two words form the Chit Chat pack. I added pink color to the inside of the word "Winter". To finish, I added some jewels... I always use the jewels...they make everything look a thousand times better... :) I hope you had a great start in the new year and are ready to scrap some winter photos!


YOUTUBE | FACEBOOK | INSTAGRAM

DOODLEBUG PRODUCTS USED

Snow Much Fun Collection

OTHER

Metallic watercolors

Tuesday, January 9, 2024

SNOW MUCH FUN WINTER WONDERLAND LAYOUT | with Nathalie

Happy New Year! It is officially Winter here in Canada, that means we are in for lots of cold temperatures, cozy clothing, and snow! So, the new Snow Much Fun collection is just perfect to document the many memories we will be making during the next 4-5 months! Let me show you my first project with the collection...


I just love the color palette in this collection, and pulled a picture of my nephew all covered in snow after an afternoon of sledding on his driveway!


I started my page with a bit of mixed media on the background (just some ink blending with splatters of ink and shimmering watercolor to match the papers). While the background dried, I ripped large strips from the Ice Crystals and Snow Much Fun papers, so that I can attach them to the top of the page.


Next, I backed the photo with a paper from the 6x6 paper pad, and adhere it to a few more layers (from the Odds and Ends pack, and Freeze Tag paper). I made sure to place the photo to the right side of the page, on top of the mixed media section on the background, I brought a few of the snowflakes (from all the embellishments in the collection) to create a cascade of them from the top to bottom of the page.


I love the Chit Chat sentiments, they made it so easy to create a title for my page. A few extra snowflakes from the puffy stickers and some extra shimmer watercolor splatters complete the page.


Just love how this turned out, it is just winter perfection. Be sure to check the new Snow Much Fun collection, and share with us what you create with it! XO


DOODLEBUG PRODUCTS USED

Snow Much Fun Collection

OTHER

Ink
Watercolors

Monday, August 28, 2023

HELLO AGAIN STAY COOL LAYOUT | with Guest Designer Ali Skifton

I am so happy to be sharing my third layout as Guest Designer this month using the fantastic Hello Again collection.   

I used a 12x12 white cardstock as my base. The mixed media was created with two different stamps from my stash, and I used a pretty blue ink to match the blue in the Hello Again collection. 

 
The hexagons were cut out of the 6x6 paper pad, and I used 8 different cute patterns for this page.  

I created three flower clusters for my page.  I used the flower die cuts from the Bits & Pieces and added some flower sprinkles from the Hello Beautiful set on top of them.  I just love how the sprinkle flowers shine.  Foam tape was added behind the die cut to add dimension to the page and I also went underneath to add some gold leaves and dots.  You can never have enough gold bling.  Don’t forget to add cute butterflies from the All Aflutter Sprinkles when you have flower embellishments, I added one to each flower cluster.


Two more flower clusters were added to the page for a triangle effect, which is very appeasing to the eye.  Thanks for joining me today and I hope you have a wonderful day!


DOODLEBUG PRODUCTS USED

Hello Again Collection

OTHER

Hexagon Die
Blue Ink
Stamps

Pin It button on image hover