Showing posts with label special delivery. Show all posts

Monday, April 1, 2024

DOODLEBUG SHAKERS - GIANT SHAKER POPS | with Kathy

Happy April! I'm excited to be kicking off a couple of weeks of Shakers Inspiration! I just love the new shakers... they are so fun, and come in all of Doodlebug's fabulous colors and some different shapes!  I had so many ideas on how to use them, it was hard to narrow it down!  I finally decided, that I should make some giant Shaker Pops... just like the Shaker-Pops that come with all of the collections, just bigger! Because... well who doesn't love a Shaker Pop???  Take a peek...

I added my giant Shaker Pops to the fronts of some A2 Cards... and I just love them!  They really were easy to make.  I started with some Doodlebug SVG files (linked at the bottom of the post).  I put them together using some Doodlebug papers, Heavy Weight Acetate, Shakers and some chipboard.  I've outlined the general steps below.


First, I looked for files that had a "shape" to fill.  I cut those shapes from a thinner chipboard using my Silhouette Cameo.  For each shaker, I cut 6 pieces of the chipboard.  This gave the shaker enough "height" to fit the shakers.  I also cut a solid of each shape from our Heavy Weight Acetate.

Next I stacked the chipboard pieces and glued them all together.  As an added step (not necessary, but it adds a nice finishing touch) I cut a thin strip of paper (just slightly smaller than 1/8 inch) and covered the edges of my shaker.  You could also paint the edges.

I cut the other pieces of my chosen cut files and glued my chipboard "frame" to the base of the cut file. 

I added my shakers, and then added a top piece of the cut file which was layered on top of the  acetate and glued.  

I like to make the shakers in their entirety before adding to a project, it gives them a bit more stability. Here are my three giant Shaker Pops!


And here are the individual cards...


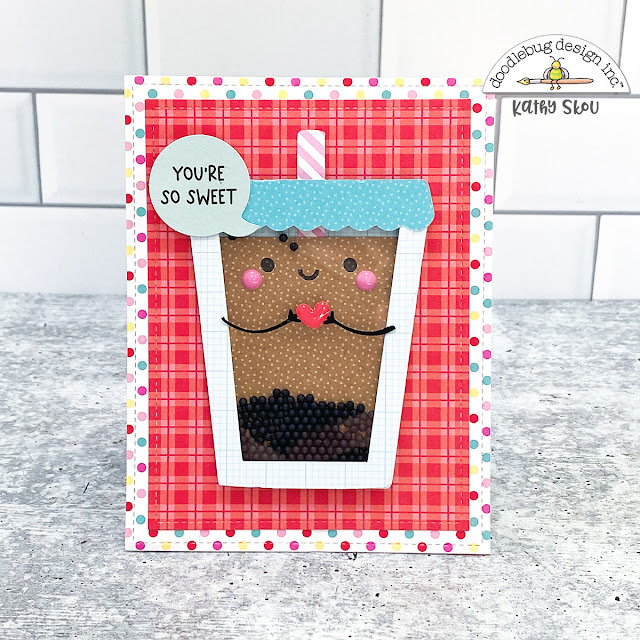
For my first card I started with the Lots of Love Bubble Tea SVG.  I used the outline of the cup for my "frame"  I pieced the shaker together using some different Petite Prints and filled it with beetle black Shakers.  The card base and sentiment are from the Lots of Love collection.


My second card is based on the Pretty Kitty- Curious Kitty SVG.  I used the fish bowl as my frame for the shaker.  The kitty was pieced together using petite prints and the card with papers from the Pretty Kitty Collection.  The Hello and little fish are from the Seaside Summer Collection.  I filled the fish bowl with some Lily White Shakers.  


For my last card, I have a baby shower coming up soon and thought it would be fun to make a little card.  I started with the Special Delivery Bottle SVG.  I pieced it together using some petite prints and filled it with lily white shakers.  The card base is a combination of petite prints and Special Delivery papers.


 These really were so fun to make!  Be sure to check in often over the next couple of weeks for more Shaker inspiration.  That's it for me today, thanks for stopping by to peek!


DOODLEBUG PRODUCTS USED

Doodlebug Shakers
Heavy Weight Acetate
Lots of Love Collection
Pretty Kitty Collection
Special Delivery Collection
Seaside Summer Collection
Petite Prints
Lots of Love Bubble Tea SVG
Pretty Kitty- Curious Kitty SVG
Special Delivery Bottle SVG

OTHER

Silhouette Cameo
Silhouette Chipboard
Stitched Rectangle Dies

Monday, May 30, 2022

SHADOWBOX INSERT KITS SPECIAL DELIVERY & BUNDLE OF JOY | with Kathy

There's not much more special than a new baby... unless it's two new babies!  My cousin and his wife are expecting twins... a boy and a girl!  We are all so excited for them!  Of course, as soon as I saw the new Shadowbox Insert Kits for Special Delivery and Bundle of Joy I knew I had the perfect gift for the new parents!  I set to work immediately!  Take a peek....


Some close-ups....


These insert kits are super easy and fun to put together.  They come with all of the stickers, jewels and sprinkles you need, along with a fabulous guide.  You just need to add some pop-dots and foam strips.  I love the Scrapbook Adhesives 3D Foam Squares and 3D foam Strips.  They are the perfect size and width for some of the more delicate stickers. 

To start, you will want to trim the included vellum piece to be 8"x 8".  Then using washi tape (or very low tack tape) center the vellum over the template and secure.  Now for the fun part, embellish! I find it easiest to start with the jewels.  


Next I add the shaped sprinkles which are noted on the template with an "S".  If there's an X with the S, it means to use a foam dot on that sprinkle to pop it up.


Once the sprinkles were done, I added the stickers.  Some stickers are flat while others are popped up... as indicated by an X on the template.  I find it easiest to do all the flat stickers first, then the popped up ones.


This is where the thin pop up strips come in handy.  They can be cut to fit the smallest pieces. Of course you can use any type of foam tape or pop dots.


Once you've got all the stickers done, just check to make sure you haven't missed any spaces.


The kit also comes with a piece of white cardstock to back the vellum.  I trimmed that to be 8"x 8", and added it behind the vellum in the frame.  You can also use patterned paper if you prefer.

These shadowboxes were a big hit with the parents to be... I can't wait to see them in the nursery!  That's it for me today, thanks for stopping by to peek!


DOODLEBUG PRODUCTS USED
Shadowbox Insert Kit - Bundle of Joy
Shadowbox Insert Kit - Special Delivery

OTHER
Scrapbook Adhesives 3D Foam Squares
Scrapbook Adhesives 3D Foam Strips
8x8 shadowbox frames

Monday, April 18, 2022

SPECIAL DELIVERY BABY BOY FIRST YEAR ALBUM | with Kathy

We are at that point when there's lots of new babies entering our lives... nieces & nephews, friends' children, my younger cousins are all having babies.  I'm so excited... nothing better than cuddling and loving a new baby... and then giving him/her back before they fuss!!!  It has also kept me busy in the craft room... I love giving something special to the new parents.  I made this first year album for my nephew's new little guy using the Special Delivery Collection.  


I used this file for the cover of the album.  I added a "hidden binding" to hold 12 pages.  That left me enough space to document the baby's arrival through the first birthday.  I then set to decorating pages for each month of the first year.
 

I love the cut apart sheet with the series of lists.  The It's a Boy section was perfect for my first pages.  And how cute is that little stork??


I created little notes using this file for each month to document baby's favorites, milestones, what's new and outings and activities.  I also added a space to document how the baby is growing... height and weight.  These were all done using the print & cut feature of my Silhouette. Each set of pages has a little flag with the month using the My Type Alphas.  All that was left was the fun part... using the Special Delivery Odds & Ends and Chit Chat pieces to decorate each set of pages.  Take a peek...


The last pages of the book celebrate baby's first birthday!  I added a few Odds & Ends from the Party Time Collection.  I love how the 2 collections coordinate seamlessly!


I can't wait to meet my new great-nephew (we always knew I was a Great-Aunt, this just solidifies it :)) I also can't wait for them to fill this book with lots of adorable photos!  That's it for me today, thanks for stopping by to peek!


DOODLEBUG PRODUCTS USED
Special Delivery Collection
Party Time Collection
Petite Prints
My Type Alphabet Stickers

OTHER PRODUCTS USED
Christmas Countdown Book SVG
Silhouette Cameo
Chipboard
Seam Tape
White Cardstock
Adhesives/Glue/Foam Tape


Wednesday, September 30, 2020

SPECIAL DELIVERY PREGNANCY JOURNAL | with Shellye

Well before the SPECIAL DELIVERY day, is the nine months leading up to it!  Today I'm sharing a sweet journal for capturing all of those mom-to-be moments along the way.

I chose to use a sheet of white craft foam for the cover, but a laminated sheet of patterned paper could also be used.  You may also think about a premade journal that could be covered paper too!

For the inside, I used three A6 kraft journals with 60 lined papers (I purchased them from Amazon) in each.  
To get started, the foam and patterned paper sheets were trimmed to 9"X6".  I used adhesive tape to adhere the paper to the foam and then machine-stitched around the perimeter.  
Three 1/8" holes were punched at the top and bottom center of the cover and then strung with 20mm white elastic cording.  Check out the tutorial on my YouTube Channel!

Before threading through the closure elastic, I added buttons and shaped clips! The adorable bear lapel pin and sticker letters completed the cover.


Each of the three journals' kraft covers was covered in different patterned; mini cards were turned into little pockets for decorating the covers.


At the center of each notebook, I added a folded envelope that can be used for storing tags, ephemera, etc.  


Strips of leftover papers were folded in half, corner-rounded and attached as tabs!


Die-cuts and small tags are also cute additions to the pockets.


The possibilities are endless with such a project...I hope you'll give it a try!


Doodlebug Design Products:
Special Delivery Collection
Confetti Sprinkles
Baby Boy Boutique Buttons
Baby Bear Enamel Pin
Chunky Doodle Twine
Large Tags Doodle Cuts
Nighty Night Shaped Sprinkles
Create-A-Cards & Envelopes
Stars & Moons Cute Clips
Sunny Skies Cute Clips

Pin It button on image hover