Thursday, March 19, 2020

PATTERNED PAPER & PUNCHES ON A LAYOUT | with Erica

Do you love to use a lot of pattern paper but struggle when trying to make it work on your page? One way I love to get a lot of color and patterns on a page is to use my paper punches! I have a stash of punches that I have had for years and recently I have been pulling them out more and more to use on my projects. One of my favorite punches right now is my 2 3/8 scallop punch! I went through the Simply Spring 6x6 paper pad and punched out a stack of scallops. There are many ways to arrange the scallops on a page so just have fun and create something that makes you happy. Once I had my scallops arranged I used my Therm O Web adhesive runner to stick them into place. I did bend up the edges a bit so they had some dimension.
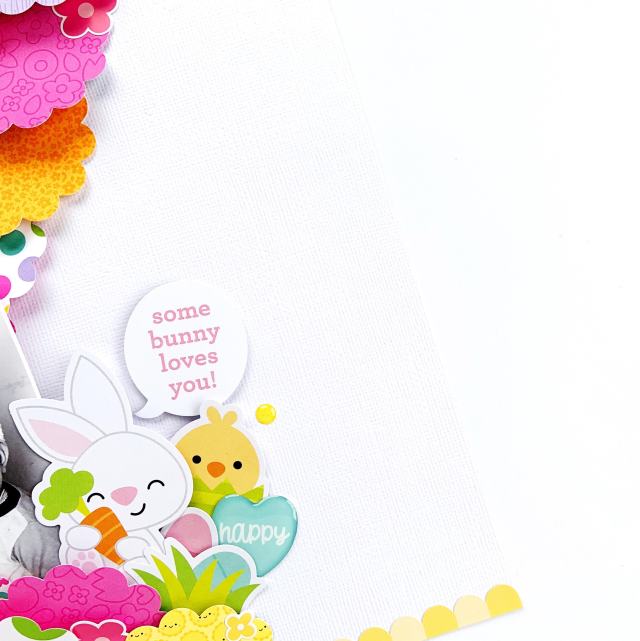
I pulled out the Hoppy Easter odds & ends to embellish around my photo. I thought these would be perfect to go with the photo of our little Liam wearing some bunny ears. I also pulled in a heart epoxy flair from Scrappin Happy Studio. Layering up the odds & ends to create a little scene around my photo adds dimension and interest! I think it turned out super cute and love how some things are popped up more than others! Next time you get started on a project think about pulling out some of your paper punches! Thanks so much for stopping by the blog today! I hope you found some inspiration using pattern papers and punches.


 Have a wonderful day! 


Doodlebug Products Used:
Simply Spring 6x6 Paper Pad
Lily White Textured Cardstock
Simply Spring this & that cardstock stickers
Simply Spring mini icon stickers
Hoppy Easter odds & ends
Glitter Sprinkles valentine assortment
Other
2 3/8 Scallop Paper Punch
Scrappin Happy Studio Epoxy Flair
Therm O Web adhesive

Wednesday, March 18, 2020

HAPPY MAIL + TUTORIAL | with Shellye

Oh my HAPPY MAIL!  Today I'm sharing an upcycled project using an empty washi tape tube and other various goodies from Doodlebug Design.

Here are a few supplies that I used from my stash:


First, I wanted to create my own 1" circle stickers using the new Doodle Stamps.  
To do so, I added an adhesive backing to a sheet of Neena cardstock.  Next, I die-cut 1" circles from the sticker paper and then stamped various images with Memento Tuxedo Black Ink.


After coloring the images with alcohol markers, I embellished with itty bitty pieces such as shaped sprinkles and very small stickers from the Mini Icons.

Before starting on the tube transformation, I cleaned away the adhesive residue and dirt with glass cleaner.  The stickers on the lid of the tube were also peeled away and cleaned.

I knew that I wanted to add a couple rolls of washi tape to the container, so I found the measurement needed with that in mind.

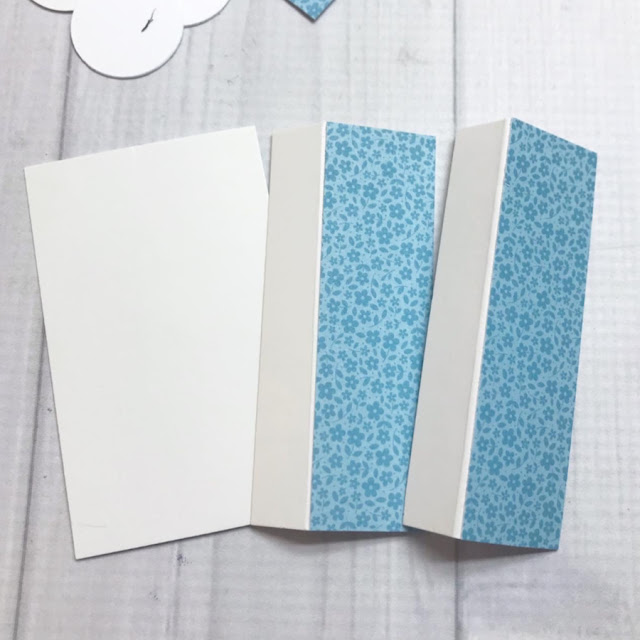
I cut a piece of lightweight chipboard (from the back of a 6X6 paper pad works great!) to the width and height needed. Next, I cut two strips 1.5" wide and then scored at 1".  These two tabs will be added to the first chipboard piece to form the insert.


I covered the chipboard with patterns of 6X6 papers and then adhered the smaller strips to the larger piece.  Next I cut paper to cover not only the remaining chipboard, but the tabs as well.

The divider now slides into place and the slots can be filled!


I covered the mini clothespins with leftover pieces of paper and made some monthly calendar flags using the new stamps.


After filling the four slots with goodies, I also added a divider to the top!  Above you'll see that I threaded on a single sequin to the mini paper clips and nestled them inside the rolls of washi tape.

To keep the paper clips from sliding down into the tube, I made a circle divider and punched a notch so that it's easily removed.

Finally, the lid was embellished with a large bow and a ring holding several tags and shaped clips.
There are so many ways that you could modify this design to make your happy mail one-of-a-kind!

Thanks for joining me today!

Doodlebug Products Used:
Mini Paperclips
Sequins
Boutique Buttons
Mini Clothespins
Gingham Assortment Washi Tape (and tube)
Odds and Ends
Mini Icon Stickers
Doodle Stamps
Cute Clips
Petite Prints 6X6 Paper Pads

Tuesday, March 17, 2020

I❤️ TRAVEL SCRAPBOOK LAYOUT | with Tegan

If you are like me, you have lots of travel pictures to document.  And what better way to document all of these pics than with the I Heart Travel collection! The bright colors are so fun and all of the graphics are just beyond adorable. I Heart Travel, of course, was a great match for my photo from a recent trip to Hollywood Studios in Orlando, Florida! 

​I used the star from the Doodlebug Design Lots O' Luck Lucky Shapes cut file to create a square star design in my die cut machine software. I backed the white cardstock star background with the more solids patterned papers from the I Heart Travel collection and the Petite Prints collection because I wanted the colors to pop. I used the Skinny Alphabet letter stickers in Ladybug and a Chit Chat Ephemera word to complete the title.


​ I love how the colorful square I made using the Gingham Washi Tape Assortment turned out!  I then used Icons Stickers, Mini Icons Stickers, and This & That Stickers to embellish my page.  And the adorable Going Places Washi Tape adds perfect little accents!

​ I just love creating rainbow cut out designs on my layouts! 


Doodlebug Design Products Used:
​ I Heart Travel Collection
​ Gingham Washi Tape Assortment
​ Petite Prints Bumblebee Dot-Stripe Patterned Paper
​ Lots O' Luck Lucky Shapes Cut File

Other:
​ Electronic Die Cut Machine


Pin It button on image hover